If you want to learn how to clear a clogged toilet, you are in the right place. Toilet clogs are common, and they can quickly turn stressful. Fortunately, most clogged toilets can be fixed safely with the proper tools and the correct step-by-step process. Moreover, when you act quickly, you can prevent overflows, water damage, and expensive plumbing repairs.
Whether your toilet drains slowly, backs up completely, or threatens to overflow, this guide will help you fix the problem confidently.
🔍 Understanding the Project
A clogged toilet happens when waste, toilet paper, or foreign material blocks the toilet trap or drain line. However, not all clogs are the same. Some clogs sit close to the bowl, while others occur deeper inside the plumbing system.
Common causes include:
- Excess toilet paper 🧻
- Flushable wipes
- Feminine hygiene products
- Toys or foreign objects 🧸
- Paper towels
- Low-flow toilet issues
- Drain line buildup
You may notice warning signs before a full blockage develops. For example, the toilet may flush slowly, bubble, gurgle, or rise unusually high before draining.
Ignoring a clogged toilet can create larger plumbing issues. Therefore, it is important to address the problem quickly before it leads to overflowing water, damaged flooring, or sewer line backups.
🧰 Tools & Materials
Before you begin, gather the following tools:
- Flange toilet plunger
- Rubber gloves
- Bucket
- Towels or rags
- Toilet auger
- Dish soap
- Hot water
- Small cup or container
- Flashlight
- Disinfectant cleaner
Optional tools:
🦺 Safety First Before You Clear the Toilet
Before starting, avoid flushing repeatedly. Each flush adds more water to the bowl. Consequently, overflowing water can damage flooring and surrounding materials.
If the water level is rising:
- Remove the toilet tank lid carefully.
- Push the flapper closed immediately.
- Turn the shutoff valve clockwise behind the toilet.
- Place towels around the base of the toilet.
Next, reduce the water level if necessary using a cup and bucket.
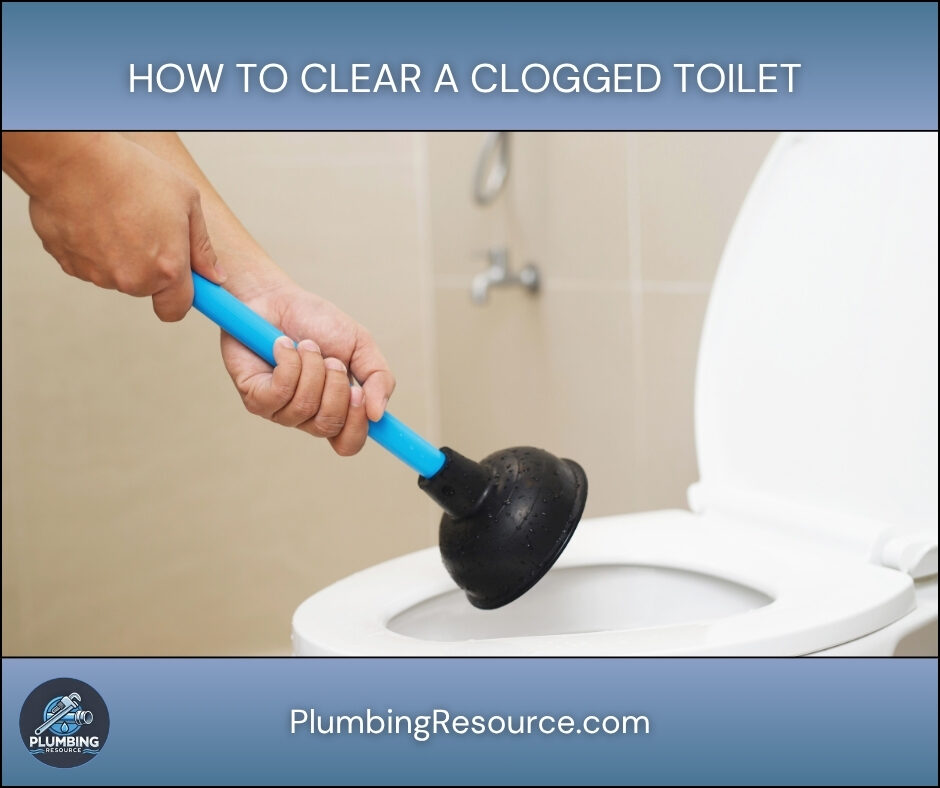
🛠️ Step-by-Step Guide: How To Clear a Clogged Toilet With a Plunger
1️⃣ Use the Correct Plunger
Always use a flange plunger instead of a flat sink plunger. The flange creates a better seal inside the toilet drain.
Without a proper seal, plunging becomes much less effective.
2️⃣ Position the Plunger Correctly
Insert the plunger into the drain opening slowly. Then, angle it slightly to remove trapped air.
The rubber cup should remain fully submerged. Therefore, add water if the bowl level is too low.
3️⃣ Plunge the Toilet Properly
Push down gently first. Then, pull upward firmly while maintaining the seal.
Continue plunging steadily for 15 to 20 seconds.
Do not use violent force. Instead, use controlled pressure to move water back and forth through the clog.
After several strokes:
- Pull the plunger upward quickly
- Watch the water movement carefully
- Listen for drainage sounds
If the water drains rapidly, the clog has likely cleared.
🛠️ How To Clear a Clogged Toilet Using Hot Water and Dish Soap
Sometimes soft clogs need lubrication instead of aggressive plunging.
1️⃣ Add Dish Soap
Pour about one cup of dish soap into the bowl. The soap helps loosen waste and toilet paper buildup.
2️⃣ Add Hot Water
Next, pour hot tap water into the toilet from waist height.
Do not use boiling water. Extremely hot water can crack porcelain toilets.
Allow the mixture to sit for 15 to 20 minutes.
3️⃣ Test the Toilet
Flush once carefully.
If the bowl drains normally, the clog has cleared successfully.
However, if the water rises again, move to the auger method.
🛠️ How To Clear a Clogged Toilet With a Toilet Auger
A toilet auger is one of the best tools for stubborn toilet clogs.
1️⃣ Insert the Auger
Place the curved end of the auger into the toilet opening carefully.
Then, rotate the handle clockwise while feeding the cable into the trap.
2️⃣ Break Through the Clog
Continue turning the auger slowly.
Eventually, you may feel resistance. This usually means the cable has reached the blockage.
Apply steady pressure while rotating.
The auger may:
- Break apart the clog
- Grab foreign material
- Push debris through the drain
3️⃣ Remove the Cable
Slowly retract the cable while continuing to rotate the handle.
If the auger retrieves an object, remove it carefully and dispose of it properly.
Afterward, flush the toilet to test drainage.
🛠️ How To Clear a Clogged Toilet Caused by Foreign Objects
Some toilet clogs involve solid objects instead of paper buildup.
Common examples include:
- Toys
- Toothbrushes
- Wipes
- Air fresheners
- Hygiene products
If plunging fails immediately, avoid repeated flushing.
Instead, use an auger carefully. However, if the object feels firmly stuck, the toilet may need removal.
⚠️ Common Mistakes
Avoid these common DIY plumbing mistakes:
- Using boiling water
- Flushing repeatedly
- Using chemical drain cleaners
- Using excessive force
- Using the wrong plunger
- Ignoring slow drainage symptoms
Additionally, harsh chemicals can damage plumbing pipes and toilet components.
💡 Pro Tips
- Use a flange plunger only
- Keep a toilet auger at home
- Flush less toilet paper at one time
- Teach children what should not be flushed
- Address slow flushing early
- Test drainage before leaving the bathroom
Furthermore, regular maintenance helps prevent recurring clogs.
🔧 Troubleshooting
Toilet Still Drains Slowly
A partial blockage may remain deeper in the drain.
Try:
- Additional auger passes
- More hot water treatment
- Inspecting nearby fixtures
Toilet Gurgles When Flushed
This may indicate:
- A vent problem
- Main sewer line blockage
- Drain line restriction
Therefore, further inspection may be necessary.
Multiple Fixtures Back Up
If sinks, tubs, or showers also back up, the issue likely involves the main sewer line.
This problem usually requires professional drain cleaning equipment.
👨🏻🔧 When To Call a Professional Plumber
Sometimes DIY methods are not enough.
Call a licensed plumber if:
- The toilet overflows repeatedly
- Multiple drains back up
- Sewer odors appear
- Water leaks around the toilet base
- An auger cannot clear the blockage
- Foreign objects remain stuck
- The clog returns frequently
Professional plumbers can use:
- Drain machines
- Sewer cameras
- Hydro jetting equipment
- Advanced diagnostic tools
❓ FAQ
How do you clear a clogged toilet fast?
The fastest method usually involves a flange plunger and proper plunging technique. However, stubborn clogs may require a toilet auger.
What is the best tool to clear a clogged toilet?
A flange plunger works best for most soft clogs. Meanwhile, a toilet auger works better for deeper or solid blockages.
Can hot water damage a toilet?
Hot tap water is usually safe. However, boiling water can crack porcelain and should never be used.
Why does my toilet keep clogging?
Frequent clogs may indicate:
- Low-flow toilet issues
- Sewer line problems
- Drain buildup
- Improper flushing habits
Can you use chemical drain cleaners in toilets?
Most plumbers do not recommend chemical drain cleaners. These products can damage pipes and create safety hazards.
✅ Conclusion
Learning how to clear a clogged toilet can save you time, money, and frustration. Fortunately, most toilet clogs can be fixed using proper plunging techniques, hot water treatment, or a toilet auger. Moreover, understanding the warning signs of serious plumbing issues helps you prevent larger problems later.
Take your time, use the correct tools, and follow each step carefully for the best results.
👋🏼 Before You Go…
If this guide helped you fix your sink, then save it for future reference. Also, share it with someone dealing with a clogged drain.
And if you want more expert plumbing tips, check out more guides on your site to stay ahead of costly problems.