If your home suddenly has no hot water, strange tank noises, or water leaking around the heater, you need to know How To Repair a Water Heater before the problem gets worse. Fortunately, many water heater problems are repairable with the right tools, proper diagnosis, and a clear process. In addition, understanding how the system works helps you avoid unnecessary replacements and expensive emergency calls.
Whether you have a gas or electric unit, this guide walks you through every major repair scenario step by step.
🔍 Understanding the Project
Water heaters fail for several reasons. However, most issues develop gradually over time. Sediment buildup, worn heating elements, failed thermostats, pilot light issues, corrosion, and leaking valves are among the most common causes.
Electric water heaters often fail because of burned-out heating elements or bad thermostats. Gas water heaters commonly experience pilot light problems, thermocouple failures, or burner issues. In addition, leaking tanks can result from internal corrosion or excessive pressure.
Common warning signs include:
- No hot water
- Water that turns cold too quickly
- Rust-colored water
- Popping or rumbling noises
- Water leaks around the base
- A pilot light that will not stay lit
If ignored, these problems can worsen quickly. For example, sediment buildup reduces efficiency and overheats components. Likewise, leaking water can damage flooring, walls, and nearby fixtures.
Understanding the source of the issue before beginning repairs is critical. Therefore, always diagnose the problem carefully before replacing parts.
🧰 Tools & Materials
- Adjustable wrench
- Pipe wrench
- Screwdrivers
- Multimeter
- Garden hose
- Bucket
- Towels
- Flashlight
- Heating element wrench
- Replacement heating element
- Replacement thermostat
- Replacement thermocouple
- Pipe tape
- Shop vacuum
- Socket set
- Needle nose pliers
- Voltage tester
- Replacement drain valve
- T&P relief valve
- Work gloves
- Safety glasses
🛠️ Step-By-Step Guide: How To Repair a Water Heater
1️⃣ Turn Off the Power or Gas
Before starting any repair, shut off the energy source to the water heater.
For electric heaters:
- Turn off the breaker inside the electrical panel.
- Then use a voltage tester to confirm power is off.
For gas heaters:
- Turn the gas control valve to OFF.
- In addition, allow several minutes for residual gas to clear.
Never work on an energized water heater because serious injury can occur.
2️⃣ Shut Off the Water Supply
Locate the cold water shutoff valve above the heater. Then rotate the valve clockwise until it stops.
This step prevents additional water from entering the tank during repairs. In addition, it reduces the chance of flooding when components are removed.
3️⃣ Diagnose the Water Heater Problem
Identifying the exact issue saves time and money. Therefore, inspect the heater carefully before replacing anything.
Common problems include:
No Hot Water
- Failed heating element
- Tripped breaker
- Bad thermostat
- Pilot light outage
- Failed thermocouple
Not Enough Hot Water
- Sediment buildup
- Broken dip tube
- Incorrect thermostat setting
Water Leaking
- Loose fittings
- Bad drain valve
- Failed T&P valve
- Tank corrosion
Strange Noises
- Sediment accumulation
- Expanding metal
- Overheating components
Take notes during inspection because symptoms often point directly to the failed part.
4️⃣ Drain the Water Heater Tank
Many repairs require partial or complete draining.
- Attach a garden hose to the drain valve.
- Run the hose to a safe drain location.
- Open a nearby hot water faucet.
- Then open the drain valve slowly.
If sediment blocks the valve, use a small screwdriver carefully to loosen debris.
Allow the tank to cool before draining because extremely hot water can cause burns.
5️⃣ Test the Heating Elements on Electric Water Heaters
If the heater produces no hot water, the elements may be burned out.
- Remove the access panels.
- Pull back insulation carefully.
- Disconnect wires from the element terminals.
- Use a multimeter to test resistance.
Most healthy elements read between 10 and 30 ohms.
If the reading shows infinity or zero resistance, replace the element.
6️⃣ Replace a Failed Heating Element
If testing confirms failure, install a new element.
- Use an element wrench to remove the old element.
- Clean the threaded opening.
- Apply pipe tape to the new element threads.
- Tighten the replacement securely.
Then refill the tank completely before restoring power.
Never energize an empty electric water heater because the new element will burn out immediately.
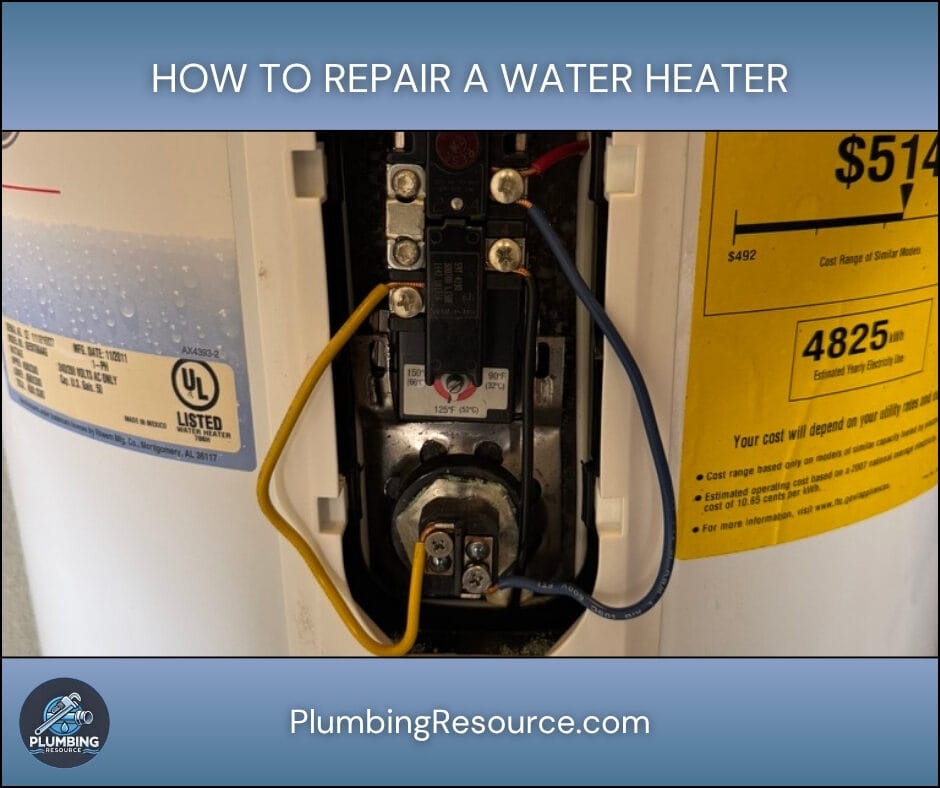
7️⃣ Replace a Faulty Thermostat
Bad thermostats often cause inconsistent temperatures.
- Disconnect power completely.
- Remove thermostat mounting clips.
- Transfer wires one at a time.
- Install the new thermostat.
Set the temperature to 120°F afterward.
Higher settings increase scald risk and energy consumption.
8️⃣ Relight the Pilot Light on Gas Water Heaters
Gas heaters frequently lose hot water because the pilot goes out.
- Turn the control knob to PILOT.
- Press and hold the pilot button.
- Use the igniter repeatedly until the flame appears.
- Continue holding for 30 to 60 seconds.
If the flame dies immediately afterward, the thermocouple likely failed.
9️⃣ Replace the Thermocouple
The thermocouple senses pilot flame heat and controls gas flow.
- Shut off the gas supply.
- Remove the burner assembly.
- Disconnect the thermocouple.
- Install the replacement component.
- Reassemble carefully.
Then relight the pilot and verify operation.
1️⃣0️⃣ Flush Sediment From the Tank
Sediment buildup is extremely common. Over time, minerals settle at the bottom of the tank and reduce heating efficiency.
- Drain several gallons from the tank.
- Briefly open the cold supply valve.
- Stir up remaining sediment.
- Continue flushing until water runs clear.
Annual flushing helps extend heater lifespan significantly.
1️⃣1️⃣ Repair Water Heater Leaks
Leaks can originate from multiple areas. Therefore, inspect carefully.
Loose Connections
Tighten fittings carefully using two wrenches.
Drain Valve Leaks
Replace faulty drain valves if dripping continues.
T&P Relief Valve Leaks
Install a new valve if pressure relief continues after testing.
Tank Leaks
If the actual tank shell leaks, replacement is necessary.
Unfortunately, tank corrosion cannot be repaired permanently.
1️⃣2️⃣ Refill and Restore the Water Heater
After repairs:
- Close the drain valve.
- Open the cold water supply.
- Open several hot faucets.
- Bleed air from the system completely.
Once water flows steadily:
- Restore electrical power
OR - Relight the gas heater.
Then monitor the heater carefully during operation.
⚠️ Common Mistakes
- Turning power on before the tank fills
- Forgetting to shut off the breaker
- Overtightening threaded fittings
- Ignoring sediment buildup
- Replacing parts without testing first
- Setting thermostat temperatures too high
- Forgetting to check for leaks afterward
💡 Pro Tips
- Flush the tank yearly to reduce sediment.
- Replace the anode rod every few years.
- Install a water alarm near the heater.
- Insulate hot water pipes for improved efficiency.
- Keep the thermostat near 120°F.
- Label the water heater breaker clearly.
🔧 Troubleshooting
Water Still Is Not Heating
Check both heating elements and thermostats again. In addition, verify breaker voltage.
Pilot Light Keeps Going Out
Inspect the thermocouple and burner assembly.
Water Smells Like Sulfur
The anode rod may need replacement.
Pressure Relief Valve Continues Dripping
Excessive water pressure or thermal expansion may exist.
Water Heater Makes Loud Popping Sounds
Heavy sediment buildup likely remains inside the tank.
👨🏻🔧 When to Call a Professional
Some repairs require professional assistance.
Call a licensed plumber if:
- The tank itself leaks
- Gas odors are present
- Wiring appears damaged
- The venting system fails inspection
- Water damage has spread
- The heater repeatedly trips breakers
- Corrosion affects major components
Professional diagnosis becomes especially important with older systems.
❓ FAQ
How To Repair a Water Heater with no hot water?
Start by checking the breaker, thermostat, heating elements, or pilot light depending on the heater type.
How To Repair a Water Heater leaking from the bottom?
Inspect the drain valve, fittings, and T&P valve first. However, tank corrosion usually requires replacement.
Can I repair a gas water heater myself?
Yes, many repairs are manageable. However, gas leaks and venting issues require professional service.
How often should I flush my water heater?
Most manufacturers recommend flushing once per year.
Why does my water heater make popping noises?
Sediment buildup overheats trapped water beneath the debris layer.
✅ Conclusion
Learning How To Repair a Water Heater can save you money, prevent water damage, and restore reliable hot water faster. In addition, understanding common failure points helps you diagnose issues confidently before they become major problems. With the right tools, careful inspection, and proper repair steps, many water heater problems can be resolved without replacing the entire unit.
👋🏼 Before You Go…
If this guide helped you, save it for future repairs and share it with someone dealing with water heater problems. A good repair guide can save hours of frustration later.


