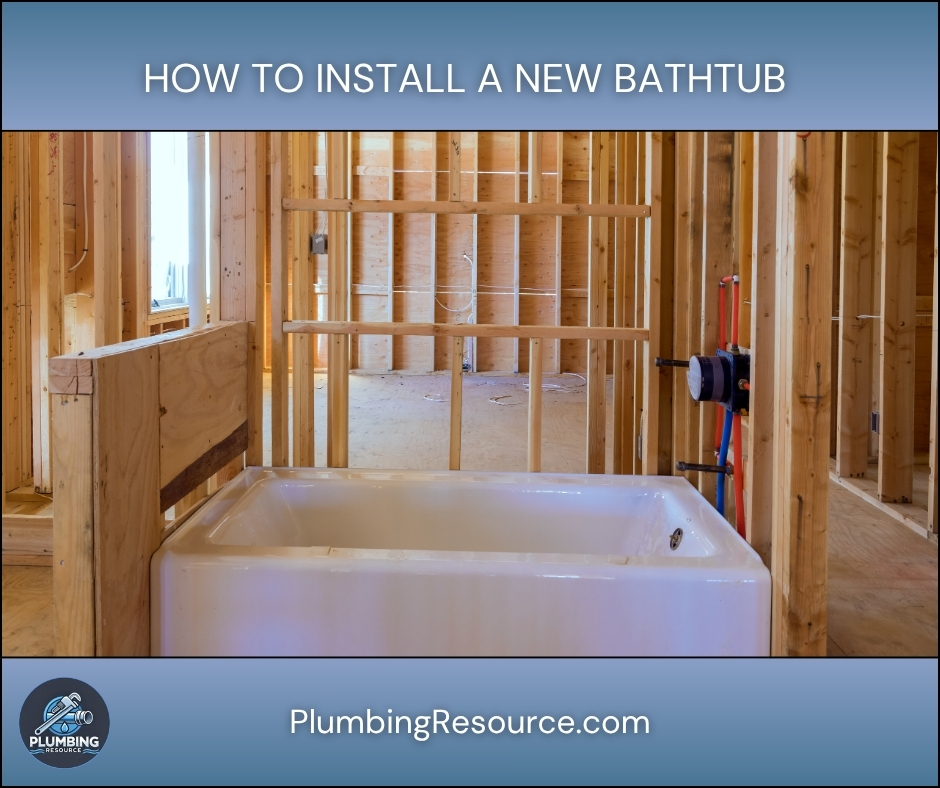
Installing a new bathtub can completely change the look and function of your bathroom. However, a poor installation can lead to leaks, floor damage, mold growth, and costly repairs. Therefore, learning How To Install a New Bathtub the right way helps ensure the tub stays solid, level, and leak-free for years.
Many homeowners replace tubs during bathroom remodels. In addition, some upgrade old fiberglass tubs to deeper soaking tubs or modern acrylic designs. Although the process takes planning, patience, and attention to detail, the project becomes manageable when broken into clear steps.
🔍 Understanding the Project
A bathtub serves as both a plumbing fixture and a waterproof bathing system. Therefore, the installation must support the tub’s weight while also preventing leaks behind walls and under floors.
Proper installation matters because bathtubs hold a large amount of water. In addition, the tub must support the weight of the person using it. If the tub flexes or shifts, cracks and leaks can develop over time.
Before starting, you must confirm compatibility with:
- Drain location
- Tub dimensions
- Framing space
- Plumbing connections
- Flooring height
- Wall surround type
Many installations become difficult because of uneven floors, incorrect drain alignment, or poor wall preparation. However, planning ahead reduces most problems before they start.
🧰 Tools & Materials
- Tape measure
- Level
- Drill and drill bits
- Screwdriver
- Adjustable wrench
- Channel-lock pliers
- Utility knife
- Pry bar
- Hammer
- Stud finder
- PVC cutter or hacksaw
- Tub drain wrench
- Silicone caulk
- Plumber’s putty
- Mortar mix
- Bucket
- Shims
- Screws
- Roofing nails
- New bathtub
- Drain and overflow kit
- PVC pipe and fittings
- PVC Primer and Cement
- Cement board
- Waterproof membrane
- Safety glasses
- Gloves
🛠️ Step-By-Step Guide: How To Install a New Bathtub
1️⃣ Turn Off the Water Supply
First, shut off the bathroom water supply. If local shutoffs are unavailable, turn off the main water supply to the house.
Next, open nearby faucets to relieve pressure. This step helps prevent accidental water discharge while working.
2️⃣ Remove the Existing Bathtub
Carefully remove the wall surround or tile around the tub area. Then, disconnect the drain assembly and overflow connection.
Use a pry bar to loosen the old tub from the framing. Afterward, lift and remove the tub from the bathroom.
Cast iron tubs are extremely heavy. Therefore, additional help may be necessary.
3️⃣ Inspect the Framing and Subfloor
Before you install anything new, inspect the framing and floor carefully.
Look for:
- Water damage
- Rot
- Mold
- Cracked subfloor sections
- Loose framing
Replace damaged materials immediately. Otherwise, the new installation may fail later.
4️⃣ Measure the Opening
Measure the alcove width, length, and depth. Then, compare those measurements to the new tub dimensions.
Also, confirm:
- Drain side orientation
- Stud spacing
- Plumbing height
- Overflow clearance
This step prevents alignment issues later.
5️⃣ Dry Fit the New Bathtub
Place the bathtub into the opening temporarily without securing it.
Next, check:
- Level from side to side
- Level from front to back
- Drain alignment
- Wall contact
- Floor stability
If the tub rocks or flexes, correct the floor issues before continuing.
6️⃣ Install a Ledger Board
Many tubs require ledger boards for support. Therefore, follow the manufacturer’s specifications carefully.
Mark the ledger height on the studs. Then, install the support boards securely using screws.
The ledger helps support the tub rim and reduces movement.
7️⃣ Prepare the Drain and Overflow Assembly
Assemble the drain and overflow kit before final tub placement.
Apply plumber’s putty or silicone beneath the drain flange. Then, tighten the drain assembly using a drain wrench.
Next, connect:
- Overflow tube
- Drain shoe
- Waste tee
Make sure all gaskets sit evenly.
8️⃣ Create a Mortar Bed
Many acrylic and fiberglass tubs require a mortar base for support.
Mix mortar until it reaches a thick consistency. Then, spread several piles beneath the tub base area.
The mortar helps prevent flexing and cracking.
9️⃣ Set the Bathtub Into Place
Lower the tub carefully into position.
Then:
- Press the tub into the mortar
- Confirm the drain aligns properly
- Check level again
- Ensure the tub contacts the ledger evenly
Adjust immediately before the mortar cures.
🔟 Secure the Bathtub Flange
Fasten the tub flange to the wall studs using roofing nails or screws with washers.
Do not overtighten fasteners. Otherwise, the flange may crack.
Secure all sides evenly.
1️⃣1️⃣ Connect the Drain Plumbing
Next, connect the tub drain assembly to the P-trap.
Depending on your plumbing system, you may use:
- PVC
- ABS
- Brass
- Tubular connections
Afterward, tighten all joints securely.
1️⃣2️⃣ Test for Leaks
Fill the bathtub partially with water. Then, inspect:
- Drain connections
- Overflow connections
- P-trap joints
- Pipe fittings
Next, release the water and watch for leaks during draining.
This step is critical because hidden leaks can destroy flooring and framing.
1️⃣3️⃣ Install Cement Board Around the Tub
Install cement board above the tub flange.
Leave a small gap between the board and tub deck. Then, apply waterproofing membrane according to manufacturer instructions.
Proper waterproofing helps prevent moisture intrusion.
1️⃣4️⃣ Install Tile or Tub Surround
Now install the wall finish around the bathtub.
Depending on your design, you may use:
- Tile
- Fiberglass surround panels
- Acrylic wall systems
- Stone panels
After installation, allow materials to cure fully.
1️⃣5️⃣ Apply Silicone Caulk
Apply 100% silicone caulk around:
- Tub edges
- Corners
- Wall joints
Smooth the caulk bead evenly for a watertight seal.
Allow proper curing time before using the tub.
1️⃣6️⃣ Perform a Final Inspection
Finally, inspect the entire installation.
Check:
- Tub stability
- Drain speed
- Overflow function
- Wall waterproofing
- Caulk lines
- Floor support
A proper final inspection helps catch problems before regular use begins.
⚠️ Common Mistakes
- Installing the tub without checking level
- Skipping the mortar bed
- Overtightening the drain assembly
- Forgetting waterproofing behind tile
- Using drywall instead of cement board
- Misaligning the drain location
- Ignoring soft subfloor areas
- Applying insufficient caulk
💡 Pro Tips
- Always dry-fit the tub before permanent installation.
- Use composite shims instead of wood shims in wet areas.
- Fill the tub with water before final caulking.
- Install an access panel when possible.
- Photograph plumbing before closing walls.
- Use high-quality silicone for longer-lasting seals.
🔧 Troubleshooting
Tub Feels Soft or Flexible
The mortar base may be insufficient. Therefore, the tub may require additional support.
Drain Leaks During Testing
Check gasket orientation and drain tightness. In addition, inspect for cross-threading.
Water Drains Slowly
The trap alignment or venting may be incorrect.
Tub Is Not Level
Remove the tub and correct floor or shim issues before continuing.
Cracks Appear Around Caulk
Tub movement often causes repeated caulk failure.
👨🏻🔧 When to Call a Professional
You should contact a professional if:
- Plumbing must be relocated
- Structural framing needs repair
- Drain venting is incorrect
- You discover mold or severe rot
- The installation involves cast iron tubs
- Local plumbing permits are required
Professional help may also prevent expensive water damage later.
❓ FAQ
How To Install a New Bathtub on an Uneven Floor?
You must level the floor using shims or floor repair methods before securing the tub.
How long does it take to install a new bathtub?
Most bathtub installations take one to three days depending on plumbing, tile work, and repairs.
Do all bathtubs need mortar underneath?
No. However, many acrylic and fiberglass tubs benefit from mortar support.
Can you install a bathtub without replacing the walls?
Yes. However, wall removal is often necessary for proper flange access and waterproofing.
What is the hardest part of How To Install a New Bathtub?
Drain alignment and leveling are usually the most difficult parts of the project.
✅ Conclusion
Learning How To Install a New Bathtub helps you avoid leaks, movement, and expensive future repairs. Although the project requires careful planning, each step becomes manageable when approached methodically. Proper support, waterproofing, and plumbing connections are essential for a durable installation.
👋🏼 Before You Go…
If this guide helped you, save it for your bathroom project later. Also, share it with someone planning a remodel or bathtub replacement. A well-installed bathtub can last for decades when done the right way.