A leaky pipe never gets better on its own. It always gets worse, usually at the most inconvenient time. This guide walks you through exactly how to handle a leaky pipe in any common situation, from small pinhole leaks to cracked fittings, and from copper to PVC, PEX, and galvanized steel.
Follow each step carefully. If at any point you feel unsafe or unsure, stop and contact a licensed plumber. Water damage and improper repairs can become very expensive, very fast.
Step 1: Stay Safe Before You Touch Anything
Before you grab tools, protect yourself, your home, and your system.
- Turn off the water supply.
- Whole house shutoff:
- Locate the main shutoff valve (often where water enters the home, in a utility room, garage, crawlspace, or near a meter).
- Turn a ball valve handle so it is perpendicular (across) the pipe.
- Turn a gate valve clockwise until it stops; if it feels stuck, do not force it to the point of breaking.
- Localized shutoff:
- If only one fixture line is leaking (e.g., under a sink), use the angle stop/shutoff valve for that line. Turn clockwise to close.
- When in doubt, shut off the main. It is safer.
- Whole house shutoff:
- Shut off the water heater if needed.
- If the leak is on the hot line near the water heater, turn off:
- Cold water supply into the heater.
- For gas heaters: set gas control to “Pilot” or “Off.”
- For electric: switch off the breaker.
- This prevents damage to the heater if water supply is interrupted.
- If the leak is on the hot line near the water heater, turn off:
- Protect electrical hazards.
- If water is near outlets, breaker panels, or electrical equipment, do not step into standing water.
- Turn off power to that area at the breaker if it is safe to do so.
- When unsure, call an electrician or plumber.
- Control standing water.
- Use towels, a wet/dry vac, and buckets.
- Move furniture, cardboard boxes, and electronics away from the leak.
- Early cleanup prevents mold and structural damage.
Step 2: Identify the Type and Source of the Leak
Next, figure out what exactly is leaking and what material you are dealing with. This determines your repair method.
Common Leak Types
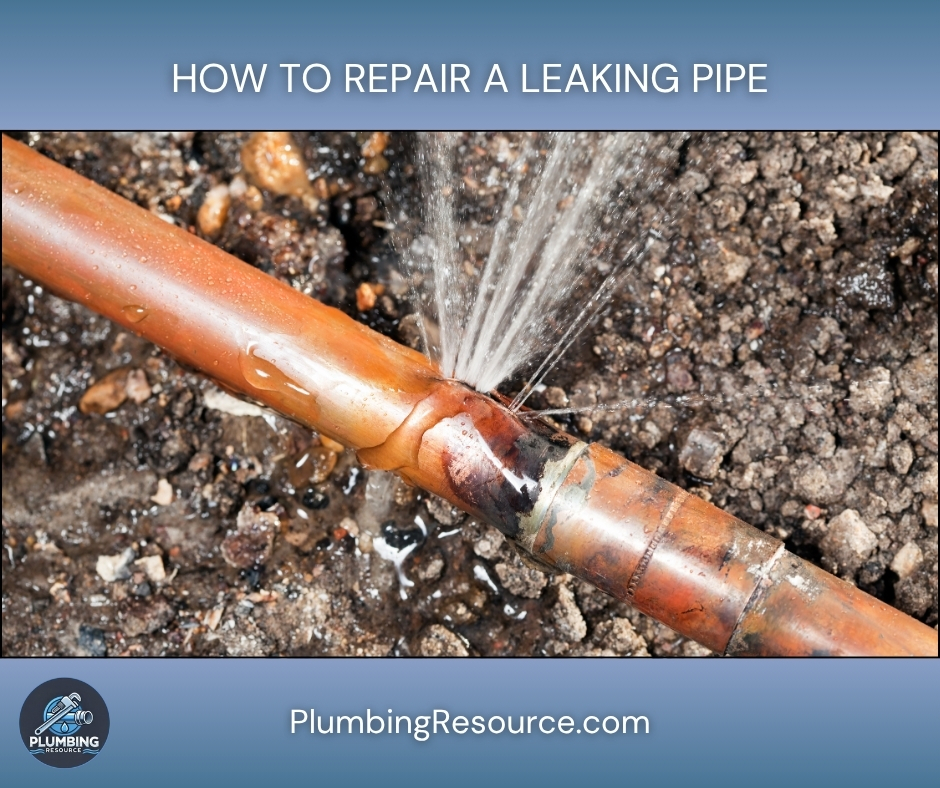
- Pinhole Leak:
Tiny spray or drip from a small hole in the pipe wall. Common in copper and old galvanized. - Joint/Fitting Leak:
Water appears at elbows, tees, couplings, threaded joints, or unions. - Cracked Pipe:
A visible split, often from freezing or impact. - Loose Connection / Compression Fitting:
Found under sinks, at shutoff valves, or on supply lines. - Corroded or Rusted Section:
Flaking, pitted metal on copper or steel, often with green or rust stains.
Identify Pipe Material
- Copper: Reddish-brown metal.
- PEX: Flexible plastic tubing (red/blue/white).
- PVC/CPVC: Rigid white, cream, or light tan plastic.
- Galvanized Steel: Dull gray threaded metal.
- Brass: Yellow/gold metal, often at fittings/valves.
Take a moment and confirm both where it’s leaking and what it’s leaking from. This prevents using the wrong repair method.
Step 3: Temporary Emergency Fix (If You Need Time)
If it is late, parts are closed, or you need to stop the leak immediately while you plan a permanent repair, use a safe temporary solution.
Option A: Pipe Repair Clamp
- Clean the pipe with a rag.
- Center the rubber pad over the leak.
- Install clamp around the pipe per instructions.
- Slowly turn water back on and check.
This is quick, strong, and good for smooth, accessible pipe.
Option B: Self-Fusing Silicone Tape
- Dry the pipe as much as possible.
- Start wrapping 2–3 inches below the leak, stretching the tape tightly.
- Overlap by at least 50% and continue 2–3 inches above the leak.
- Build several layers.
Good for pinhole leaks on copper, PEX, or small sections. Still temporary.
Option C: Epoxy Putty
- Clean and dry the area.
- Knead the epoxy until uniform.
- Press firmly over/around leak and feather edges.
- Allow full cure per manufacturer instructions.
Use this as a short-term solution only. It should not replace a proper cut-and-replace repair on pressurized lines.
Step 4: Plan the Permanent Repair
Now let’s fix it the right way based on the pipe type and leak location.
General tools and supplies you may need:
- Tubing cutter or PVC cutter
- Hacksaw/reciprocating saw (if needed)
- Deburring tool or sandcloth
- Measuring tape
- Marker
- Fittings (couplings, elbows, tees, unions)
- Replacement pipe (matching size/material)
- Primer & cement (for PVC/CPVC)
- Solder & flux / torch & MAPP gas (for copper) or press-fit fittings
- PEX fittings, crimp/sleeve rings, and crimp tool
- Two pipe wrenches (for galvanized)
- Teflon/PTFE tape and/or pipe thread sealant for threaded joints
- Bucket, rags, spray bottle
Choose your scenario below.
Step 5: Repairing a Copper Pipe Leak
Scenario A: Pinhole Leak in Straight Copper Pipe
Best fix: Cut out the bad section and install a new piece with couplings.
- Mark the damaged area.
- Identify all visible corrosion or pitting around the pinhole.
- Cut out the section.
- Use a tubing cutter for a clean, straight cut.
- Cut at least 1 inch beyond visible damage on each side.
- Ensure the system is fully drained (open a lower faucet).
- Prepare the pipe ends.
- Deburr inside and outside edges.
- Clean outer pipe ends with sandcloth/emery until shiny.
- Wipe clean.
- Choose your connection method:
- Soldered copper coupling: Traditional permanent method.
- Push-to-connect (e.g., SharkBite) coupling: Fast, effective, excellent for DIY when used correctly.
Option 1: Soldered Coupling
- Dry the pipe completely. Any water kills solder.
- Apply flux to outside of pipe and inside of fitting.
- Slide coupling onto pipe ends.
- Heat joint evenly with torch; touch solder to joint opposite flame.
- When solder flows around joint, remove heat and let cool.
- Repeat for both sides.
Option 2: Push-to-Connect Coupling
- Confirm pipe is round, clean, and free of scratches at the end.
- Mark insertion depth according to fitting specs.
- Push the coupling straight on until it reaches the depth mark.
- Repeat on other side with replacement piece.
Scenario B: Leaking Copper Joint (Elbow/Tees)
- If solder failed:
- Desolder by heating and pulling apart, or
- Cut out the joint and use new fittings (solder or push-to-connect).
- Never just smear sealant over a copper solder joint. Fix the fitting itself.
Step 6: Repairing a PVC or CPVC Pipe Leak
Scenario: Crack or Leak at a PVC Joint
Permanent fix always involves cutting and replacing. Glue joints cannot be “reglued” externally.
- Shut off and drain.
- Cut out the damaged section.
- Use a PVC cutter or fine-tooth saw for straight cuts.
- Dry-fit new parts.
- Measure and cut replacement pipe.
- Add couplings or unions if needed for access.
- Prime and cement (for PVC/CPVC):
- Use correct cleaner/primer first (purple primer where required).
- Apply an even coat of cement to pipe and fitting socket.
- Push pipe fully into fitting while twisting 1/4 turn.
- Hold 10–30 seconds until set.
- Cure time:
- Follow label instructions before repressurizing (usually 15 minutes to several hours depending on size/pressure).
Step 7: Repairing a PEX Pipe Leak
PEX is forgiving and great for repairs.
Scenario: Pinhole or Damaged Section in PEX
- Cut out bad section.
- Use a PEX cutter for a straight, square cut.
- Install new section with:
- Crimp rings and PEX fittings, or
- Expansion fittings (if using PEX-A), or
- Push-to-connect couplings rated for PEX.
- Crimp method basics:
- Slide crimp ring on pipe.
- Insert fitting fully.
- Position ring 1/8″–1/4″ from pipe end.
- Crimp with proper tool; verify with gauge.
Avoid mixing random metals or non-rated components that can cause failures later.
Step 8: Repairing Galvanized Steel Pipe Leaks
Galvanized is tricky and often brittle. Expect fittings to be stubborn.
Scenario: Leaking Threaded Joint or Rusted Section
- Identify nearest threaded joints.
- Support adjacent piping.
- Use two pipe wrenches:
- One to hold back, one to turn the fitting.
- Remove leaking section.
- Replace with:
- New galvanized nipple and fittings, or
- Transition to copper/PEX using appropriate dielectric/transition fittings.
- Apply thread sealant:
- Wrap male threads with PTFE tape (2–3 wraps, clockwise),
- Optionally add pipe dope over tape for stubborn joints.
If everything is severely corroded or frozen, it is usually time to call a plumber and/or repipe. Forcing may cause breaks inside walls.
Step 9: Fixing Leaks at Compression or Valve Connections
Common under sinks and on toilet/sink supplies.
- Check the nut.
- Gently snug compression nut 1/8 to 1/4 turn with a wrench.
- Do not overtighten.
- If still leaking:
- Shut off water.
- Disassemble fitting.
- Inspect or replace ferrule, insert, or supply line.
- Reassemble and tighten firmly, not aggressively.
Pre-made braided stainless supply lines are often easier and more reliable than trying to resurrect an old line.
Step 10: Turn Water Back On and Test Properly
Never assume it is fixed until it passes a slow, careful test.
- Close all faucets.
- Slowly open the main shutoff.
- Watch the repair site closely.
- Look and feel for any moisture, beads, or seepage.
- Pressurize fully.
- Flush toilets, run faucets, and run hot water if relevant.
- Check again after 5 minutes, 15 minutes, 1 hour.
- Dry everything and re-check later.
- A paper towel under the repair is a simple way to spot slow drips.
If you see sweating, weeping, or misting, shut it down and correct immediately.
Step 11: When You Should Call a Licensed Plumber
DIY is great, but some conditions require a pro:
- Repeated leaks in the same area (possible systemic corrosion).
- Old galvanized system with multiple rust spots.
- Leaks inside walls, ceilings, or under slabs.
- Gas line leaks (never DIY gas).
- You cannot fully stop the water or cannot operate the main valve.
- You are uncomfortable with torches, press fittings, or structural risks.
Knowing your limits is part of doing it right.
Step 12: How to Prevent Future Leaks
Once you have solved this one, use it as a chance to upgrade your system.
- Insulate exposed pipes in attics, garages, and exterior walls.
- Secure loose pipes to prevent vibration and stress.
- Address water hammer with arrestors.
- Check water pressure:
- Ideal around 50–70 psi.
- If over 80 psi, install or service a pressure-reducing valve.
- Replace failing sections rather than patching repeatedly.
- Schedule periodic visual checks of visible piping runs.
Consistent small efforts now prevent big emergencies later.