Introduction: Why the Thermostat Matters
The thermostat on your water heater is the “brain” that tells the heating element when to turn on and off. When it fails, you may notice:
- No hot water at all
- Water that is too hot or scalding
- Inconsistent water temperature
- Only a small amount of hot water before it goes cold
In this guide, I will walk you step-by-step through replacing an electric water heater thermostat, which is the most common DIY scenario. I will also explain what to do if you have a gas water heater, and when you should stop and call a professional instead of trying it yourself.
⚠️ Safety First: Working on a water heater involves electricity, hot water, and sometimes gas. If you are not comfortable, call a licensed plumber or qualified professional.
Step 1: Identify Your Type of Water Heater
Before you touch anything, you need to know what you’re working on.
1.1 Electric vs. Gas Water Heater
- Electric Water Heater
- Usually has two metal access panels on the side (upper and lower).
- Has electrical conduit or cable entering the top or side.
- No burner at the bottom, no flue pipe going up.
- Gas Water Heater
- Has a gas line connected at the bottom or side.
- Has a burner compartment near the bottom.
- Has a vent pipe or flue going up from the top of the tank.
- The thermostat is usually part of the gas control valve.
This guide will focus on electric thermostats, which are safer and more realistic for a DIYer.
⚠️ For Gas Water Heaters:
The thermostat is integrated into the gas control valve. Replacing this involves working with gas connections and combustion safety. Because of the risk of gas leaks, fire, or explosion, I strongly recommend that only a licensed professional replace gas water heater thermostats/gas valves. You can still use this guide to understand the process and ask better questions, but do not attempt gas valve replacement yourself.
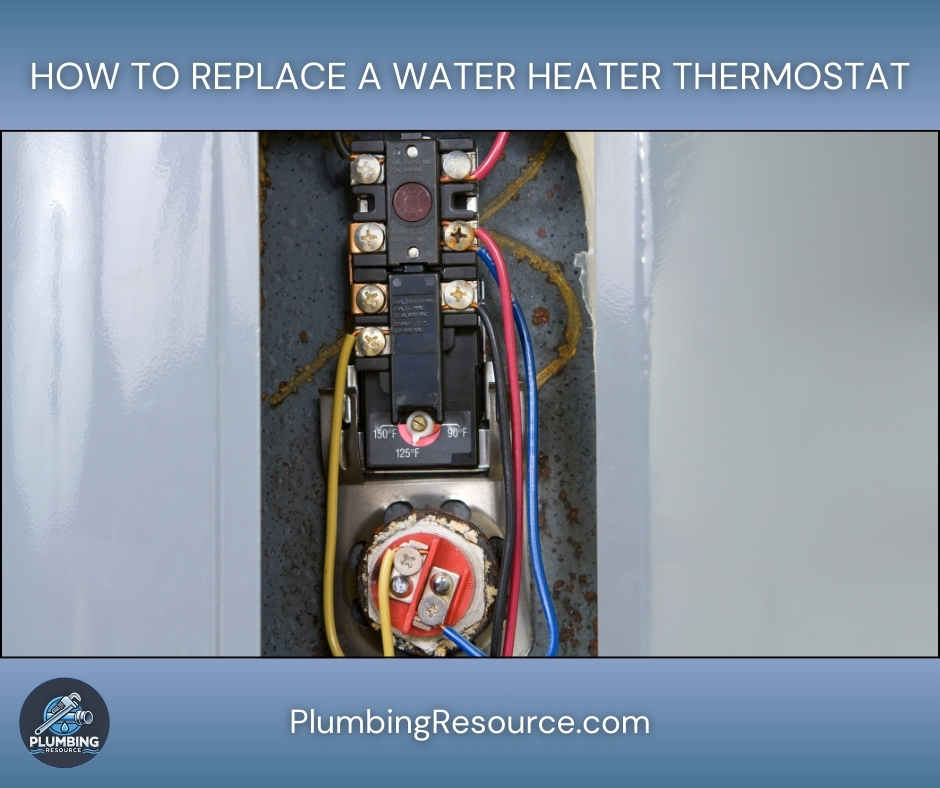
Step 2: Know the Parts You’re Dealing With
On a standard electric tank water heater, you typically have:
- Upper thermostat (controls upper element and often overall function)
- Lower thermostat (controls lower element)
- Upper heating element
- Lower heating element
- High-limit reset button (ECO) – a red button on the upper thermostat
In many cases, you’ll replace just one thermostat (upper or lower). Sometimes, to avoid future problems, it makes sense to replace both while you already have the panels open.
Step 3: Gather Tools and Materials
Having everything ready before you start makes the job smoother and safer.
3.1 Tools
- Flathead and Philips screwdriver
- Non-contact voltage tester (strongly recommended)
- Multimeter (for diagnosing if you want to confirm the problem)
- Needle-nose pliers (optional but helpful)
- Small flashlight or work light
3.2 Materials
- Replacement thermostat(s) matched to your heater type
- Single-element or dual-element
- Proper voltage (typically 240V in the U.S., sometimes 120V on small point-of-use tanks)
- Camera or phone (to take photos of wiring before you disconnect anything)
💡 Pro Tip: Bring your old thermostat, model number, or a clear photo to the parts store to make sure you get an exact or compatible match.
Step 4: Safety – Turn Off Power and Confirm
4.1 Turn Off Power at the Breaker
- Go to the electrical panel (breaker box).
- Look for the double-pole breaker labeled “Water Heater” or something similar, usually 30A or 40A.
- Flip the breaker to the OFF position.
⚠️ Never trust the label alone. Panels are often mislabeled. You must test for power at the heater.
4.2 Confirm Power Is Off
- Remove the upper and lower access covers on the water heater using a screwdriver.
- Peel back or gently pull away the insulation and the plastic protective cover if present.
- Use a non-contact voltage tester to check the wires going into the thermostat and elements.
- Place the tester near each terminal and wire.
- There should be no beeping, no light indicating voltage.
If your tester indicates any power, go back to the panel and verify you turned off the correct breaker. Do not proceed until power is confirmed off.
Step 5: Diagnose the Thermostat (Optional but Helpful)
If you want to be sure the thermostat is the problem and not the element, you can test.
5.1 Common Symptom Patterns
- No hot water at all:
Often the upper thermostat or upper element. - Some hot water, then quickly cold:
Often the lower thermostat or lower element. - Water too hot / scalding:
Thermostat set too high or thermostat stuck closed.
5.2 Using a Multimeter (Basic Check)
⚠️ Only do this if you are comfortable with electrical testing. Power should remain OFF while checking continuity.
- Set the multimeter to ohms (Ω) or continuity.
- Remove one wire at a time from the thermostat terminals (so you don’t get a false reading from the rest of the circuit).
- Follow the wiring diagram on the heater or on the thermostat:
- Test between specific terminals as indicated.
- A properly functioning thermostat will open/close circuits when you adjust the temperature dial and simulate a call for heat (tank cool).
If this feels too advanced, it is perfectly acceptable to replace the thermostat based on symptoms and process of elimination, especially if the heater is older.
Step 6: Remove the Old Thermostat
The removal process is similar for upper and lower thermostats on electric heaters.
6.1 Take a Photo of the Wiring
Before loosening anything:
- Use your phone to take clear photos of the thermostat wiring from a couple of angles.
- Make sure you can see where each color wire lands on which terminal.
This becomes your backup “wiring diagram” when you put it back together.
6.2 Loosen and Label Wires (Optional but Smart)
- Using the appropriate screwdriver, loosen the terminal screws on the thermostat.
- Gently pull each wire free.
- If you want extra security, you can place small pieces of tape near wires and label them according to the screw they were on (e.g., “T1”, “T2”, “TOP LEFT”, “BOTTOM RIGHT”).
💡 Pro Tip: Work methodically. Remove and label one wire at a time rather than all at once to avoid confusion.
6.3 Release the Thermostat from the Mount
Most electric thermostats sit against the tank and are held in place by metal spring clips or brackets.
- Gently bend the clip away or lift the thermostat up and out of the clip.
- Carefully pull the thermostat away from the tank.
Note how the back of the thermostat rests firmly against the tank. This contact is essential because the thermostat senses temperature through the tank wall.
Step 7: Install the New Thermostat
7.1 Match the New Thermostat
Before installing:
- Verify that the new thermostat:
- Matches the voltage (120V vs 240V).
- Matches the configuration (upper vs lower, and single-pole vs double-pole as required by your heater).
7.2 Mount the New Thermostat
- Slide the new thermostat into the same metal clip or bracket.
- Make sure the back of the thermostat is flat against the tank.
- If it’s crooked or not seated properly, it may not read the tank temperature correctly and can cause overheating or improper operation.
7.3 Reconnect the Wires
Using your photo and/or labels:
- Install each wire back onto the correct terminal.
- Tighten each screw firmly, but do not overtighten to the point of stripping threads.
- Ensure no bare copper is exposed beyond the terminal and that no wires are loose or crossing where they shouldn’t.
⚠️ Loose connections can cause arcing, overheating, and potential fire hazards.
Step 8: Set the Temperature Properly
Each thermostat has an adjustable temperature dial.
8.1 Recommended Temperature
For most homes, a setting of 120°F (about 49°C) is recommended because:
- It reduces the risk of scalding, especially for children and elderly people.
- It helps save energy.
- It still provides comfortable hot water for most uses.
8.2 Adjusting the Dial
- Use a screwdriver or your fingers to turn the dial to around 120°F (or the manufacturer’s recommended household setting).
- If you have both upper and lower thermostats:
- Set them to the same temperature to keep the tank balanced.
💡 Pro Tip: If you have a mixing valve or specific household needs, you may fine-tune this later, but start at 120°F and test.
Step 9: Reinstall Insulation and Covers
Proper reassembly is important for efficiency and safety.
- Replace the foam or fiberglass insulation over the thermostat and wiring.
- Do not leave any bare wires exposed.
- Reinstall the plastic protective shield if your heater has one.
- Reattach the metal access cover with the original screws.
Ensuring a tight fit of insulation and covers helps the heater operate efficiently and protects the wiring from accidental contact.
Step 10: Restore Power and Test
10.1 Turn the Breaker Back On
- Return to the electrical panel.
- Flip the water heater breaker from OFF back to ON.
You will not feel an immediate change at the tap; the tank needs time to heat.
10.2 Allow Heating Time
- For a standard electric tank:
- Expect 30–45 minutes for noticeably warm water.
- Full recovery (from a completely cold tank) may take up to an hour or more, depending on tank size and element wattage.
10.3 Test the Hot Water
After sufficient time:
- Open a nearby hot water faucet (like a bathroom sink).
- Let it run for a couple of minutes.
- Check that:
- Water gets hot consistently.
- It’s not lukewarm or scalding.
If the water is now hot and stable, your thermostat replacement was successful.
Step 11: What If It Still Doesn’t Work?
If, after replacing the thermostat, you still have issues, here are common scenarios.
11.1 No Hot Water Still
Possible causes:
- Heating element failure (very common)
- High-limit reset tripped
- Wiring issue or loose connection
- Breaker or power supply problem
Check the high-limit reset:
- Turn power off again at the breaker.
- Remove the upper access cover and insulation.
- On the upper thermostat, look for the red reset button (high-limit).
- Press it firmly until you feel or hear a click.
- Replace insulation and cover, restore power, and test again.
If the breaker trips repeatedly or the heater still doesn’t work, you may need to test and/or replace the heating elements or call a professional.
11.2 Water Too Hot After Replacement
If the water is hotter than expected:
- Turn off power again.
- Recheck the thermostat setting (lower it to about 120°F).
- Confirm the thermostat is flush against the tank and not dangling or tilted.
If it remains excessively hot, the thermostat may be faulty or miswired, or you may have a wiring issue. At that point, it is wise to call a licensed plumber or electrician.
Special Note: Gas Water Heater “Thermostats”
As mentioned earlier, most gas water heaters use an integrated gas control valve with thermostat. Replacement involves:
- Shutting off gas supply and verifying it is off
- Disconnecting the gas line and sometimes the burner assembly
- Removing and reinstalling the control valve
- Checking for gas leaks with proper testing methods
- Verifying proper burner operation and flue drafting
Because mistakes in gas work can lead to fire, explosion, or carbon monoxide poisoning, this is generally not a DIY project. If your gas water heater is not maintaining temperature properly, contact a licensed plumber or gas-qualified technician.
Step 12: Preventive Maintenance Tips
Once your thermostat is replaced and working, a little maintenance will help extend the life of your water heater.
- Flush the tank annually to reduce sediment buildup.
- Check thermostats and wiring visually when you perform other maintenance.
- Keep the area around the heater clear to allow proper airflow and access.
- Consider installing a leak detector or drip pan with drain in areas where leaks could cause damage.
Conclusion
Replacing a water heater thermostat on an electric unit is a very doable project if you:
- Turn off and verify power before touching any wiring.
- Identify whether you’re working on an upper or lower thermostat (or both).
- Document the wiring before removal.
- Mount the new thermostat correctly, flush against the tank.
- Set a safe temperature, reassemble carefully, and test.
Handle each step slowly and deliberately, and you will greatly reduce the chance of problems. If at any point you’re unsure or uncomfortable-especially with gas units-stop and call a professional.