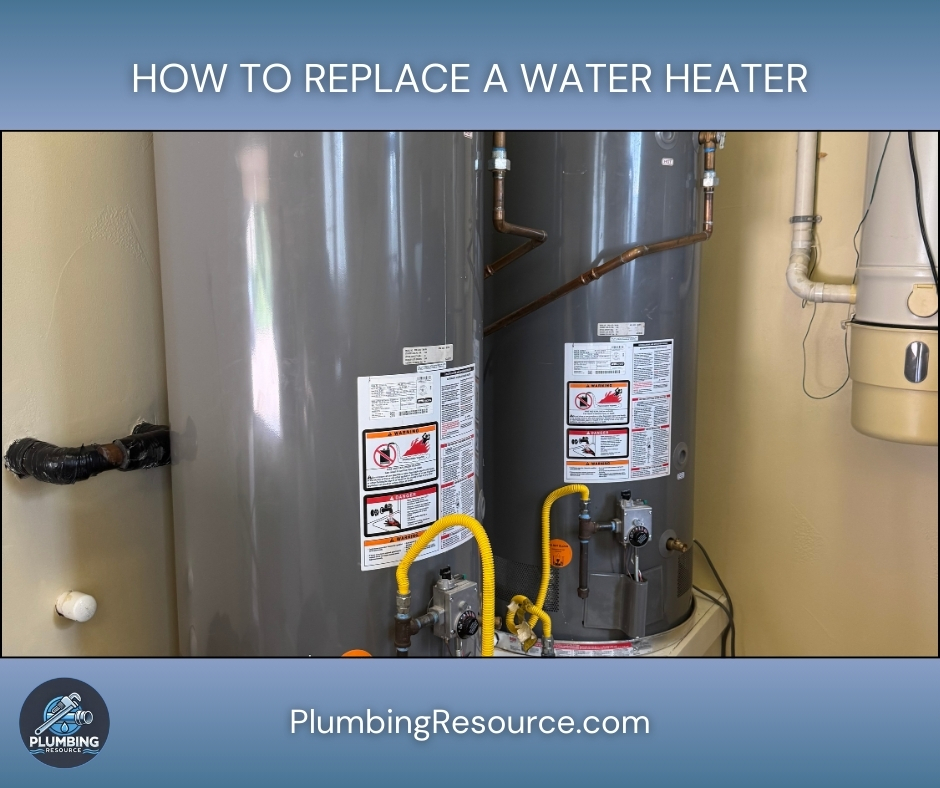
Replacing a water heater can feel intimidating, especially when you’re dealing with gas lines, electricity, and heavy equipment. However, with the right planning, the proper tools, and clear steps, many homeowners can handle a basic water heater replacement safely-while also knowing when to stop and call a professional.
In this guide, we’ll walk through the entire process of water heater replacement from start to finish, covering both gas and electric tank-style heaters. We’ll also talk about special situations (tankless units, code requirements, expansion tanks, drainage, and tight spaces) so you can decide what you can safely do yourself and what you should leave to a licensed plumber.
⚠️ Important Safety Disclaimer:
- If you are not comfortable working with gas lines, venting, or 240-volt electrical circuits, hire a licensed plumber.
- Never modify gas piping or electrical wiring beyond simple disconnection/reconnection to an existing, properly sized setup.
- Always follow local plumbing and building codes and obtain permits where required.
Step 1: Identify Your Water Heater Type and Setup
Before you touch anything, you must understand what you’re working with. This determines the parts you need and how you’ll safely replace the unit.
1.1 Determine the type of water heater
Look at the existing unit and its connections:
- Fuel Type
- Gas (Natural Gas or Propane): You’ll see a gas line connected to a gas control valve, a burner compartment at the bottom, and usually a metal vent pipe leading up.
- Electric: You’ll see electrical conduit or a cable going to the top of the heater, and no gas line or burner.
- Style
- Tank-Style (Most Common): A large cylinder, usually 30–80 gallons. This guide focuses on these.
- Tankless (On-Demand): Smaller box on the wall with water and gas/electric connections. Replacement is more complex and often better handled by a pro.
1.2 Check the size and capacity
Find the rating plate (usually on the side):
- Capacity (Gallons): 30, 40, 50, etc.
- BTU input (for gas) or wattage/voltage (for electric)
- Recovery rate and energy rating
- Height and diameter
You usually replace with the same capacity and similar dimensions so it fits the existing space, vent, and water lines.
1.3 Note the location and access
Look at where the heater is installed:
- Garage, attic, closet, basement, outdoor closet, crawlspace
- Is there enough clearance to remove the old tank and get the new one in?
- Is there a drain nearby or somewhere you can safely route a hose when draining?
If access is extremely tight (attics, tiny closets, crawlspaces), it may be safer and more efficient to hire a pro.
Step 2: Gather Tools, Materials, and Parts
Having everything ready prevents mid-project surprises.
2.1 Tools
- Adjustable wrench
- Pipe wrenches (for threaded gas and water connections)
- Channel-lock (tongue-and-groove) pliers
- Screwdrivers (flat and Phillips)
- Tubing cutter or hacksaw (if working with copper)
- Utility knife
- Bucket and garden hose (for draining)
- Multimeter or voltage tester
- Pipe thread sealant or Teflon tape (for threaded fittings)
- Level
- Tape measure
- Flashlight or work light
- Dolly or helper for moving the tank (they are heavy)
2.2 Materials and replacement parts
Depending on your setup, you may need:
- New water heater (same type, fuel, and capacity)
- New flex water supply connectors or piping
- Dielectric unions (to prevent corrosion between copper and steel)
- Shutoff valves if existing ones are old or leaking
- T&P discharge pipe (often 3/4″ CPVC, copper, or approved material)
- Drip pan (often required when the heater is above a finished space)
- Expansion tank (if required by code or you have a closed system)
- Gas flex connector (for gas models; must be properly sized and approved)
- Vent pipe and fittings (for gas models, if the existing vent is corroded or not to code)
- Electrical whip and connectors (for electric units, if existing are damaged)
- Pipe insulation (optional but recommended for energy savings)
Step 3: Safety Preparations and Shut-Down
Before disconnecting anything, you must safely shut off utilities and verify they are actually off.
3.1 Turn off the power
- Electric heater:
- Go to your breaker panel.
- Turn off the double-pole breaker labeled for the water heater (usually 30A or 40A).
- At the heater, remove the access cover on top and use a non-contact voltage tester on the wires to confirm no power is present.
- Gas heater:
- Turn the gas control knob on the heater to “OFF”.
- Locate the gas shutoff valve on the gas pipe leading to the heater and turn it to the off position (usually perpendicular to the pipe).
3.2 Turn off the water supply
- Locate the cold-water shutoff valve on the pipe feeding the heater (usually on the right side when facing the heater).
- Turn the valve clockwise to close it fully.
- If it doesn’t fully shut off, you may need to close the main house shutoff as well.
3.3 Allow the water to cool (if possible)
If the heater was recently in use, the water inside can be very hot:
- Ideally, turn the unit off and wait several hours before draining.
- If you must proceed sooner, be extra cautious when opening valves and hoses; hot water can cause severe burns.
Step 4: Drain the Old Water Heater
You can’t safely remove the heater until it’s mostly empty.
4.1 Connect a hose to the drain valve
- Attach a garden hose to the drain valve at the bottom of the tank.
- Run the other end of the hose to a floor drain, sump, or outside where it can safely drain by gravity.
⚠️ Never drain onto landscaping you care about if the water is extremely hot, and don’t drain onto walkways where it can cause slippery conditions.
4.2 Open a hot water faucet to break vacuum
- Go to a nearby sink or tub and open the hot side.
- This allows air into the system so the tank can drain more smoothly.
4.3 Open the drain valve
- Open the drain valve slowly and let water flow through the hose.
- If water trickles or stops:
- You may have sediment clogging the drain.
- Gently close the valve, briefly open the cold-water supply to push sediment toward the drain, then try again.
- You can also carefully insert a small screwdriver or stiff wire into the drain opening (with the supply off and tank depressurized) to break up sediment, but be cautious.
Allow the tank to drain as much as possible. Even then, a little water will remain inside and make the tank heavy, so be prepared.
Step 5: Disconnect Water, Gas/Electric, and Venting
Once drained, you can safely disconnect the old unit.
5.1 Disconnect the water lines
Depending on your setup:
- Flexible connectors (easiest):
- Use adjustable wrenches to loosen the nuts and disconnect both hot and cold lines.
- Hard copper or PEX:
- If there are unions, loosen them.
- If pipes are directly soldered, you may need to cut the lines with a tubing cutter (leave enough pipe to reconnect later).
Have a towel or bucket ready for any residual water.
5.2 Disconnect the gas line (for gas heaters)
⚠️ If you are not comfortable handling gas lines, stop and call a licensed plumber. Gas leaks are extremely dangerous.
- Close the gas shutoff valve if you haven’t already.
- Use two wrenches:
- One to hold the stationary fitting for support.
- One to loosen the union or connector nut leading into the heater’s gas control valve.
- Disconnect the flex connector or union at the heater side.
- Cap or tape the open line temporarily to keep debris out (do not back-feed gas).
5.3 Disconnect the electrical (for electric heaters)
- Confirm again with your voltage tester that there is no power.
- Remove the electrical junction cover at the top.
- Disconnect the wire nuts and separate the house wires from the heater wires.
- Secure the house wires so they don’t fall back into the jacket.
5.4 Disconnect the vent (for gas heaters)
- If you have a metal draft hood and vent pipe:
- Remove the screws holding the draft hood to the top of the heater.
- Lift the hood and vent pipe up and set aside.
- If you have a power-vent unit with a blower and PVC vent, you may need to:
- Unplug the power supply.
- Disconnect the vent piping at a joint near the unit.
Check the vent pieces for corrosion or damage; you may need to replace them.
Step 6: Remove and Dispose of the Old Water Heater
Now the old heater can be moved out.
6.1 Clear the path
- Move anything that might obstruct your path from the heater to the exit door.
- Lay down cardboard or moving blankets if you’re worried about flooring.
6.2 Use safe lifting techniques
Water heaters are heavy and awkward:
- Use a dolly when possible.
- Strap the tank to the dolly.
- Have a helper assist in guiding it through doorways and over thresholds.
- Avoid lifting from the top; use the sides and bottom.
6.3 Dispose of the old unit
- Many cities have appliance recycling programs or designated drop-off locations.
- Some plumbing supply stores or retailers will take the old heater when you buy a new one.
- Follow local rules; don’t dump it in regular trash.
Step 7: Prepare the Area for the New Heater
Before bringing in the new unit, prep the installation area.
7.1 Check and clean the floor or platform
- Sweep up debris and sediment.
- If code requires a drip pan (often when the heater is above finished space or in an attic), position the pan and ensure:
- It is properly sized for your heater.
- It has a drain line to a safe discharge location.
7.2 Inspect and upgrade shutoff valves (if needed)
- Check the cold-water shutoff valve above the heater.
- If it leaks, doesn’t fully close, or is very old, consider replacing it now.
7.3 Check venting (gas only)
- Make sure your vent pipe:
- Is properly sized and slopes upward to the chimney or termination point.
- Is free from rust holes or major corrosion.
- Has proper clearances from combustible surfaces.
If venting looks questionable, stop and consult a pro; improper venting can cause carbon monoxide hazards.
7.4 Consider expansion tank and seismic strapping
- Expansion tank may be required if:
- You have a closed system (check valves, pressure-reducing valve, etc.).
- Local codes require it.
- Seismic strapping may be required in earthquake-prone areas. Follow local code on strap placement and fasteners.
Step 8: Set the New Water Heater in Place
8.1 Move the new heater into position
- Carefully move the new tank to the installation area using a dolly or helper.
- Set it into the drip pan if one is used.
- Rotate it so the hot and cold ports line up with the existing piping.
8.2 Level the unit
- Use a level on the top of the heater.
- Adjust the feet (if present) or shim the base until the heater is plumb and level.
- A level heater helps ensure proper burner operation (gas) and longevity.
Step 9: Reconnect the Water Lines
9.1 Identify hot and cold connections
- Cold inlet is usually marked “C” or blue and typically on the right.
- Hot outlet is usually “H” or red and on the left.
9.2 Install dielectric unions or nipples (if required)
- Many heaters include dielectric nipples already installed.
- If not, install them on the hot and cold ports with thread sealant or Teflon tape on threaded connections.
9.3 Connect water piping
Flexible connectors:
- Attach one end of the flex connector to the heater’s hot or cold nipple.
- Attach the other end to your household piping or shutoff valve.
- Tighten with wrenches-snug but not over-tight.
Hard piping (copper or PEX):
- Dry-fit the piping layout first.
- Follow approved joining methods:
- Solder copper fittings with lead-free solder and flux.
- Use approved fittings/clamps for PEX.
- Avoid putting direct flame near combustible materials-use heat shields where needed.
Double-check that hot connects to hot and cold to cold.
Step 10: Reconnect Gas or Electrical
This is where safety is critical. If you are not completely confident, hire a pro for this step.
10.1 Gas connection (for gas heaters)
⚠️ Gas work can be dangerous. If you smell gas at any point, stop, ventilate the area, and contact your gas provider or a professional immediately.
- Apply thread sealant suitable for gas to the threads of the adapter or fittings (if required; some flex connectors have built-in seals and don’t require tape).
- Connect the flex gas connector from the gas shutoff valve to the water heater’s gas control valve.
- Use two wrenches to avoid stressing the valve.
- Do not kink or sharply bend the flex connector.
Check for leaks:
- Mix a solution of dish soap and water in a spray bottle.
- Turn on the gas shutoff valve.
- Spray all gas connections thoroughly.
- Watch for bubbles forming or growing-this indicates a leak.
- If you see bubbles:
- Turn off the gas.
- Retighten or redo the connection.
- Test again.
- If you cannot stop the leak, call a professional immediately.
10.2 Electrical connection (for electric heaters)
⚠️ Electrical work can cause severe shock or fire if done incorrectly. If you’re unsure, hire a qualified electrician or plumber.
- Confirm the power is still OFF at the breaker.
- Remove the junction box cover on top of the heater.
- Connect house wires to heater wires:
- Typically, black to black (hot), red to red (hot), and ground wire to the green screw or grounding conductor.
- Use appropriate sized wire nuts and secure connections.
- Neatly arrange wires inside the box and reinstall the cover.
- Do not turn on the breaker yet.
Step 11: Install the T&P Relief Valve and Discharge Pipe
The temperature and pressure (T&P) relief valve is a critical safety device.
11.1 Verify or install the T&P valve
- Most new heaters come with a T&P valve factory installed.
- If not, thread one into the designated opening using thread sealant.
- Tighten securely, but do not over-torque.
11.2 Install the discharge pipe
- Attach a 3/4″ pipe to the valve outlet.
- Run the pipe:
- Downward, without upward bends.
- To a safe termination point: usually within a few inches of the floor or to a drain, according to local code.
- Do not cap or plug this pipe-ever. It must remain open for discharge.
Step 12: Fill the Tank and Check for Leaks
Never turn on power or gas before the tank is full of water.
12.1 Open a hot water faucet
- Open a hot faucet at a nearby sink or tub.
- Leave it open to allow air to escape.
12.2 Turn on the cold water supply
- Slowly open the cold water shutoff valve to the heater.
- You’ll hear water flowing into the tank.
- At the hot faucet, you’ll hear air sputtering; eventually, water will flow smoothly.
12.3 Check all connections for leaks
- Inspect:
- Hot and cold water connections.
- Tank fittings.
- T&P discharge connection.
- Any unions/couplings.
- If you see drips:
- Gently tighten the connection.
- If leak persists, shut off water, disassemble, reapply thread sealant or redo the joint, then retest.
Once water runs smoothly from the hot faucet with no air, close the faucet. The tank should now be full.
Step 13: Restore Power or Gas and Start the Heater
13.1 For electric water heaters
- Double-check the tank is full. If the elements are energized in an empty tank, they will burn out quickly.
- Turn the breaker back on.
- Check the thermostat settings (usually under access panels on the side):
- Many homeowners set 120°F for safety and energy savings.
- Electric heaters may take 1–2 hours or more to fully heat the tank.
13.2 For gas water heaters
Follow the lighting instructions on the heater’s label or manual. Typical steps:
- Turn the gas control knob to “Pilot”.
- Press and hold the knob or pilot button.
- Press the igniter button repeatedly until the pilot lights (you may see a small flame through a viewing window).
- Continue to hold the knob for 30–60 seconds as directed, then release. The pilot should stay lit.
- Turn the knob to “On” and set the desired temperature.
For older models with manual lighting, you may need a long lighter-follow the printed instructions carefully.
Step 14: Final Checks and Adjustments
14.1 Check for proper burner operation (gas)
- After the main burner ignites, listen for steady flame and inspect through the viewing port:
- Flame should be mostly blue with possibly small yellow tips.
- Excessive yellow or noisy flames may indicate issues; call a professional.
14.2 Check for proper venting (gas)
- After 5–10 minutes, place your hand or a smoke source (like an incense stick) near the draft hood:
- Smoke should be drawn up into the vent.
- If smoke spills out, there may be a backdraft or vent problem-turn off the heater and call a pro immediately.
14.3 Adjust temperature
- For both gas and electric, many manufacturers recommend around 120°F:
- Reduces scald risk.
- Saves energy.
- Homes with very young children or elderly residents may choose slightly lower settings, while some applications need higher-but never set it dangerously high without scald protection.
Special Situations and Scenarios
Scenario 1: Replacing a tankless water heater
Tankless water heater replacement involves:
- Gas line sizing and pressure checks.
- Proper venting (often special stainless or PVC).
- Complex electronics and flow-switches.
Due to the complexity and code requirements, tankless replacement is usually best handled by a licensed professional.
Scenario 2: Converting from gas to electric or electric to gas
This is not a simple swap. It often requires:
- Running new electrical circuits or upgrading service.
- Installing or altering gas piping and venting.
- Obtaining permits and inspections.
This is definitely a professional-level project.
Scenario 3: Attic or tight closet installations
- You may need special drain pans and drain lines.
- Attic work adds fall risks and limited access.
- Handling heavy tanks in attics is dangerous-hire a pro if you’re unsure.
Scenario 4: Very old piping or valves
If your shutoff valves, water lines, or gas connections are extremely corroded, they may break when you try to work on them. In that case, it’s often safer to stop and have a plumber replace those parts as part of your water heater replacement.
When You Should Call a Professional
Even handy homeowners reach a point where it’s smarter and safer to bring in licensed help. Call a pro if:
- You smell gas or suspect a gas leak.
- You see signs of improper venting or backdrafting.
- You’re not comfortable working with 240-volt circuits.
- You discover unexpected code issues or structural problems.
- The heater is in a difficult or unsafe location (attic, cramped closet, crawlspace).
- You’re changing fuel type, location, or upgrading to a tankless system.
A professional plumber will ensure your installation is safe, code-compliant, and efficient, and they can often complete the job more quickly with the right tools and parts on hand.
Final Thoughts
Replacing a water heater is a project that sits right on the line between advanced DIY and professional work. With careful planning, attention to safety, and a clear step-by-step process, many homeowners can successfully swap out an old tank-style heater for a new one.
However, never hesitate to bring in a licensed plumber if something feels over your head. Hot water is important-but safety and code compliance are non-negotiable.