If your shower keeps dripping, struggles to regulate temperature, or has weak water pressure, learning How To Replace a Shower Cartridge can solve the problem quickly. In many homes, the shower cartridge controls both water flow and temperature. Therefore, when it wears out, your shower starts showing obvious signs of failure.
Fortunately, replacing a shower cartridge is a repair many homeowners can handle with patience and the right guidance. In this guide, you’ll learn exactly how to complete the repair safely and correctly.
🔍 Understanding the Project
A shower cartridge is the internal valve component that controls hot and cold water flow inside a shower faucet. Over time, mineral buildup, worn seals, corrosion, and normal wear damage the cartridge. As a result, the shower may drip constantly or fail to maintain proper temperature.
Common signs replacement is needed include:
- Water dripping after the shower is off
- Sudden temperature changes
- Low water pressure
- Handle becoming stiff or difficult to turn
- Only hot or cold water coming out
- Squealing or grinding noises inside the valve
Ignoring these problems can eventually damage the valve body or waste large amounts of water. In addition, leaks behind the wall may lead to mold or structural damage.
Before starting, you must confirm cartridge compatibility. Many brands use different cartridge styles. Therefore, always identify your faucet brand and model before purchasing replacement parts.
Replacing the cartridge also improves shower performance. In many cases, homeowners notice smoother handle operation and more consistent water temperature immediately after installation.
🧰 Tools & Materials
- Replacement shower cartridge
- Phillips screwdriver
- Flathead screwdriver
- Allen wrench set
- Adjustable wrench
- Needle-nose pliers
- Cartridge puller
- Utility knife
- Silicone plumber’s grease
- Flashlight
- Towels or rags
- Bucket
- Penetrating oil
- Safety glasses
- Drain cover or rag
🛠️ Step-By-Step Guide: How To Replace a Shower Cartridge
1️⃣ Shut Off the Water Supply
First, turn off the water before removing any shower components.
Look for local shutoff stops behind the trim plate. However, many showers do not have local shutoffs. Therefore, you may need to shut off the home’s main water valve.
After shutting off the water, open the shower faucet briefly to relieve pressure. This step prevents sudden water spray during disassembly.
Next, place a towel over the drain. Small screws and clips can easily fall into the drain opening.
2️⃣ Identify the Shower Valve Brand
Before removing the cartridge, identify the faucet manufacturer.
Look for logos on:
- The shower handle
- The trim plate
- The faucet escutcheon
Common brands include:
- Moen
- Delta
- Kohler
- Pfister
- American Standard
If you cannot identify the brand, remove the trim first and compare the valve online. In addition, you can bring the old cartridge to a plumbing supply store for matching.
Correct identification is critical because cartridges vary greatly between manufacturers.
3️⃣ Remove the Shower Handle
Most shower handles use either:
- A Phillips screw
- A hidden Allen set screw
Carefully remove decorative caps using a flathead screwdriver. Then, loosen the retaining screw.
Once the screw is removed, gently pull the handle away from the valve stem. If the handle feels stuck, wiggle it slowly instead of forcing it.
Older handles sometimes seize due to mineral buildup. Therefore, penetrating oil may help loosen stubborn components.
4️⃣ Remove the Trim Plate
Next, remove the trim plate surrounding the valve.
Unscrew the escutcheon screws carefully. Then, use a utility knife to cut through old caulk if necessary.
Pull the trim plate away slowly. In some showers, foam gaskets or sealant may create resistance.
At this stage, inspect the wall cavity for:
- Water stains
- Mold
- Corrosion
- Active leaks
This inspection helps identify hidden plumbing issues before installing the new cartridge.
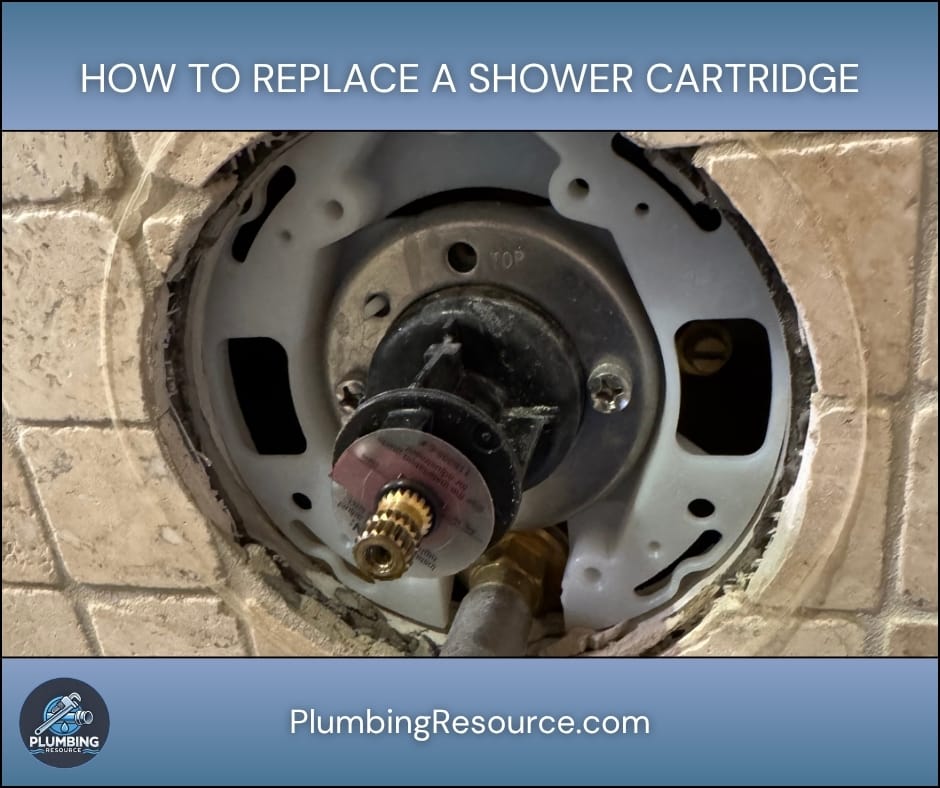
5️⃣ Remove the Cartridge Retainer
Most cartridges are secured using:
- A retaining clip
- A threaded retaining nut
For retaining clips:
- Use needle-nose pliers
- Pull the clip straight upward carefully
For retaining nuts:
- Use an adjustable wrench
- Turn counterclockwise slowly
Avoid excessive force because damaging the valve body creates a much larger repair.
6️⃣ Remove the Old Cartridge
Now you can remove the cartridge itself.
Grip the cartridge stem firmly and pull outward. However, old cartridges often become stuck from corrosion or mineral deposits.
If the cartridge will not move:
- Apply penetrating oil
- Wait several minutes
- Wiggle gently while pulling
For severely stuck cartridges, use a cartridge puller. This specialized tool removes the cartridge evenly without damaging the valve.
Take your time during this step. Rushing often breaks the cartridge stem.
7️⃣ Clean the Valve Body
After removing the old cartridge, inspect the valve body carefully.
Look for:
- Debris
- Rubber fragments
- Mineral buildup
- Corrosion
Use a flashlight to inspect the inside thoroughly.
Next, wipe the valve interior using a clean rag. If buildup exists, gently scrub using a soft brush.
In some cases, briefly turning the water on helps flush loose debris from the valve body. However, keep a towel over the opening to control water spray.
8️⃣ Prepare the New Cartridge
Before installation, compare the new cartridge to the old one.
Check:
- Overall shape
- Length
- O-ring placement
- Alignment tabs
Then, apply silicone plumber’s grease to the O-rings. This lubrication improves sealing and simplifies future removal.
Most importantly, verify cartridge orientation. Many cartridges have markings showing the correct hot and cold alignment.
9️⃣ Install the New Cartridge
Carefully align the cartridge tabs with the slots inside the valve body.
Push the cartridge straight inward until fully seated. If resistance feels excessive, stop and verify alignment.
Once seated:
- Reinstall the retaining clip
- Or tighten the retaining nut
The cartridge must sit fully inside the valve body before securing the retainer.
🔟 Reassemble the Shower Trim
Now reinstall:
- The trim plate
- Escutcheon screws
- Shower handle
- Decorative caps
Do not overtighten screws because excessive pressure can crack trim components.
If the trim plate originally had silicone caulk, apply a new bead around the top and sides. However, leave the bottom edge unsealed so hidden leaks can escape visibly.
1️⃣1️⃣ Restore Water and Test the Shower
Slowly restore water supply to the shower.
Then, test:
- Hot water
- Cold water
- Water pressure
- Handle movement
- Leak prevention
Allow the shower to run several minutes.
Next, turn the shower off completely and watch for dripping. A properly installed cartridge should stop water flow fully.
If hot and cold water feel reversed, the cartridge may need repositioning according to manufacturer instructions.
⚠️ Common Mistakes
- Buying the wrong cartridge
- Forgetting to shut off water
- Losing the retaining clip
- Installing the cartridge backward
- Over-tightening trim screws
- Damaging the valve body with excessive force
- Forgetting plumber’s grease on O-rings
- Using petroleum grease instead of silicone grease
💡 Pro Tips
- Take photos during disassembly for easier reassembly.
- Always bring the old cartridge when buying replacements.
- Use a cartridge puller on stubborn valves instead of prying aggressively.
- Clean mineral buildup thoroughly before installing the new cartridge.
- Replace old trim gaskets while the valve is exposed.
🔧 Troubleshooting
Shower Still Drips After Replacement
First, verify the cartridge is fully seated. In addition, confirm the retaining clip is installed correctly.
If dripping continues, the valve body itself may be damaged.
Water Temperature Is Reversed
Remove the handle and rotate the cartridge according to manufacturer instructions.
Cartridge Will Not Come Out
Use penetrating oil and a cartridge puller. Never pry against the valve body aggressively.
Handle Feels Hard to Turn
Remove the cartridge and inspect alignment. Also, confirm O-rings were lubricated properly.
👨🏻🔧 When to Call a Professional
You should contact a plumber if:
- The cartridge breaks inside the valve
- The valve body cracks
- Water leaks behind the wall
- You cannot identify the faucet brand
- The valve requires soldering
- Corrosion severely damages the valve
Professional help may also be necessary if the shower valve itself needs replacement.
❓ FAQ
How To Replace a Shower Cartridge without shutting off the whole house?
Some shower valves include built-in service stops behind the trim plate. If present, you can isolate the shower only.
How long does a shower cartridge last?
Most cartridges last between 5 and 15 years depending on water quality and usage.
Can a bad shower cartridge cause low water pressure?
Yes. Mineral buildup and worn internal seals can restrict water flow significantly.
How do I know which shower cartridge I need?
Match the old cartridge using the faucet brand and model number whenever possible.
Is replacing a shower cartridge difficult?
Most homeowners can complete the repair successfully with basic tools and careful instructions.
✅ Conclusion
Learning How To Replace a Shower Cartridge helps you stop leaks, restore water temperature control, and improve shower performance. Although the repair requires patience, most homeowners can complete it successfully using the correct tools and replacement parts.
With proper installation, your shower should operate smoothly and leak-free for years.
👋🏼 Before You Go…
If this guide helped you fix your sink, then save it for future reference. Also, share it with someone dealing with a clogged drain.
And if you want more expert plumbing tips, check out more guides on your site to stay ahead of costly problems.


