If your bathtub is leaking, draining slowly, rusting, or showing corrosion around the drain opening, learning how to replace a bathtub drain can help prevent larger plumbing problems. In many cases, an old tub drain begins leaking beneath the tub before visible damage appears. Therefore, replacing the drain early can help avoid water damage, mold growth, and costly repairs.
Fortunately, many bathtub drain replacements can be completed with basic plumbing tools and careful preparation. However, the process can vary depending on the type of stopper, the age of the tub, and the condition of the drain assembly.
🔍 Understanding the Project
A bathtub drain connects the tub basin to the plumbing drain system below the tub. Over time, the drain flange, stopper, and drain shoe can corrode, loosen, crack, or begin leaking. In addition, old plumber’s putty and worn seals often fail after years of use.
Several warning signs may indicate replacement is necessary:
- Water stains below the tub
- Rust around the drain opening
- Cracked or pitted drain flanges
- Persistent leaks beneath the tub
- Drain stopper failure
- Slow drainage caused by buildup
- Drain flange spinning or loosening
In some situations, replacing the bathtub drain also improves appearance and updates outdated finishes. Furthermore, newer drain assemblies often seal better and resist corrosion longer than older components.
Before starting, identify your bathtub stopper type. Common styles include:
- Toe-touch
- Lift-and-turn
- Push-pull
- Trip-lever
- Flip-it stoppers
Compatibility matters because not all bathtub drains use identical thread sizes or overflow configurations.
🧰 Tools & Materials
- Tub drain wrench
- Screwdrivers
- Adjustable pliers
- Needle-nose pliers
- Drain extractor tool
- Utility knife
- Flashlight
- Clean rags
- Bucket
- Plumber’s putty
- 100% silicone sealant
- Replacement bathtub drain kit
- Teflon tape
- Penetrating oil
- Oscillating tool (if needed)
- Gloves
- Safety glasses
🛠️ Step-By-Step Guide: How To Replace a Bathtub Drain
1️⃣ Identify the Bathtub Drain Type
First, determine the type of bathtub drain and stopper installed in the tub. This step matters because removal methods vary between stopper styles.
Toe-touch and lift-and-turn stoppers typically attach directly to the drain flange. However, trip-lever drains connect to a linkage assembly inside the overflow pipe.
Inspect the drain carefully before attempting removal.
2️⃣ Remove the Drain Stopper
Next, remove the bathtub stopper assembly.
Toe-touch stoppers:
- Open the stopper
- Unscrew the cap or remove the set screw
- Pull the stopper upward
Lift-and-turn stoppers:
- Hold the base
- Turn the knob counterclockwise
- Remove the set screw if present
Trip-lever drains:
- Remove the overflow cover plate
- Carefully pull out the linkage assembly
If parts feel stuck, apply penetrating oil and wait several minutes before trying again.
3️⃣ Inspect the Drain Flange Condition
After removing the stopper, inspect the drain flange and crossbars inside the drain opening.
Check for:
- Broken crossbars
- Corrosion
- Cracks
- Heavy mineral buildup
- Loose threads
This inspection helps determine the best removal method.
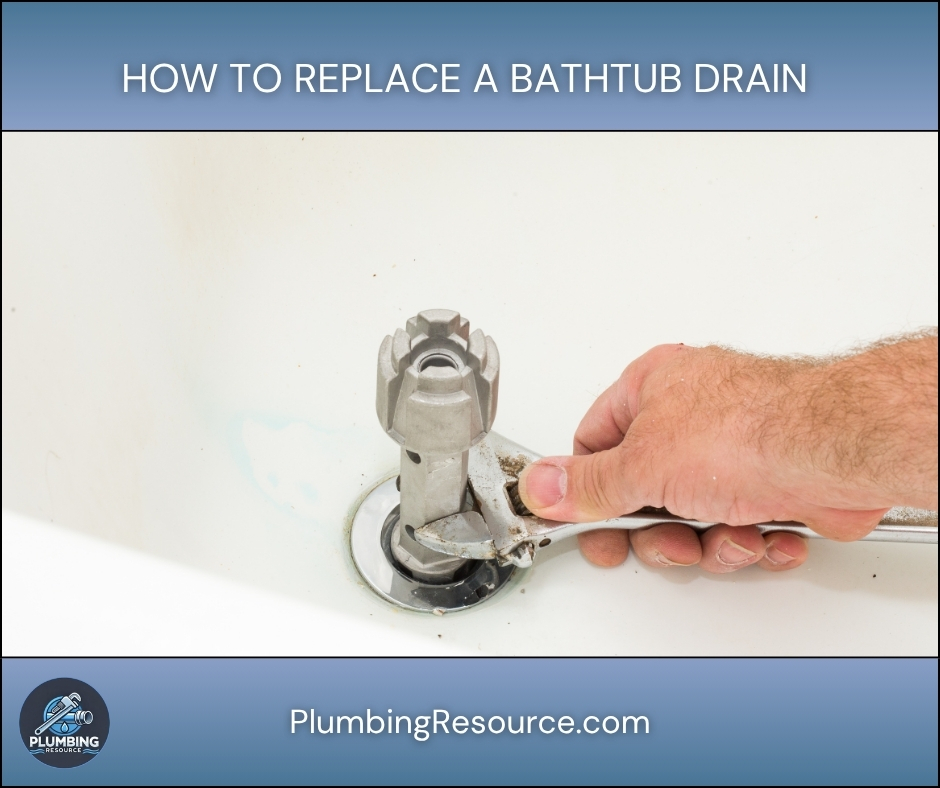
4️⃣ Remove the Old Bathtub Drain Flange
Insert a tub drain wrench into the drain flange opening. Then, turn the tool counterclockwise to loosen the drain.
If the drain is stubborn:
- Add penetrating oil
- Wait several minutes
- Use steady pressure
Sometimes old drains become seized due to corrosion or old sealant.
If the crossbars break:
- Use an internal drain extractor tool
- Carefully remove the damaged flange
In severe cases, you may need to cut the flange with an oscillating tool. However, work slowly to avoid damaging the bathtub surface.
5️⃣ Clean the Drain Opening
Once the old flange is removed, thoroughly clean the drain opening.
Remove:
- Old plumber’s putty
- Silicone residue
- Rust
- Debris
- Soap buildup
Use a plastic scraper or utility knife carefully around the tub finish. Then, wipe the area dry with a clean rag.
A clean surface helps create a watertight seal during installation.
6️⃣ Inspect the Drain Shoe and Threads
Next, inspect the drain shoe beneath the tub.
Check for:
- Cracked threads
- Corrosion
- Loose fittings
- Warped surfaces
If the drain shoe is damaged, replacing only the flange may not stop leaks. Therefore, additional plumbing repairs may be necessary.
If accessible, tighten loose fittings below the tub before installing the new drain.
7️⃣ Apply Sealant to the New Drain Flange
Now prepare the new bathtub drain flange.
If using plumber’s putty:
- Roll the putty into a rope
- Wrap it beneath the flange lip
If using silicone:
- Apply a continuous bead beneath the flange edge
Many acrylic and fiberglass tubs recommend silicone instead of plumber’s putty. Therefore, always check manufacturer recommendations first.
8️⃣ Install the New Bathtub Drain
Insert the new drain flange into the opening.
Then:
- Hand-thread the flange clockwise
- Ensure threads engage evenly
- Tighten using the tub drain wrench
Do not overtighten the flange. Excessive force can crack acrylic tubs or damage drain threads.
Tighten only until the flange sits snugly and sealant squeezes evenly around the edge.
9️⃣ Remove Excess Sealant
After tightening the drain:
- Wipe away excess plumber’s putty
- Clean silicone squeeze-out carefully
This step improves appearance and prevents debris buildup around the drain flange.
If using silicone, allow proper curing time before testing the drain.
🔟 Reinstall the Stopper Assembly
Reinstall the stopper based on its style.
For toe-touch or lift-and-turn stoppers:
- Attach the stopper body
- Tighten the set screw
- Test stopper movement
For trip-lever assemblies:
- Reinsert the linkage carefully
- Reinstall the overflow plate
- Test the stopper operation
Make sure the stopper opens and closes smoothly.
1️⃣1️⃣ Test the Bathtub Drain for Leaks
Finally, test the new bathtub drain installation.
Fill the tub with several inches of water. Then, inspect beneath the tub if access is available.
Check for:
- Water drips
- Slow leaks
- Drain movement
- Overflow leaks
Next, release the stopper and allow the tub to drain completely.
Continue inspecting for leaks during drainage because some leaks only appear while water flows through the drain assembly.
⚠️ Common Mistakes
- Overtightening the drain flange
- Forgetting to clean old putty completely
- Using the wrong stopper type
- Damaging bathtub surfaces during removal
- Installing the flange crooked
- Cross-threading the drain
- Skipping leak testing
- Using plumber’s putty on incompatible tub materials
💡 Pro Tips
- Use silicone on fiberglass and acrylic tubs when recommended.
- Always dry-fit the new drain before applying sealant.
- Keep a bucket nearby during removal.
- Replace worn stoppers while the drain is apart.
- Take photos before disassembly for easier reassembly.
- Use a flashlight to inspect hidden leaks carefully.
🔧 Troubleshooting
Drain Flange Spins but Will Not Loosen
The drain shoe below the tub may also be spinning. If possible, access the drain from below and hold the shoe while loosening the flange.
Crossbars Break During Removal
Use a drain extractor tool designed for broken bathtub drains.
New Drain Leaks After Installation
Remove the flange and reinstall it with fresh sealant. Also, inspect the drain shoe for cracks or damaged threads.
Stopper Does Not Seal Properly
Adjust the stopper height or linkage assembly. In some cases, the stopper may not match the drain type.
Bathtub Drains Slowly After Replacement
The drain line may still contain a clog farther down the pipe. Therefore, additional cleaning or snaking may be necessary.
👨🏻🔧 When to Call a Professional
You should contact a plumber if:
- The drain shoe is damaged
- Pipes beneath the tub are leaking
- The bathtub has no access panel
- The drain assembly spins freely
- Corrosion is severe
- Water damage exists below the tub
- The plumbing requires cutting or reconfiguration
Professional plumbers can also pressure test and inspect hidden drain leaks.
❓ FAQ
How do I replace a bathtub drain without damaging the tub?
Use the correct drain removal tool and avoid excessive force. In addition, protect the tub surface while cutting or prying.
Can I replace a bathtub drain without access below the tub?
Yes, many bathtub drains can be replaced from above. However, damaged drain shoes may require below-floor access.
What sealant should I use to replace a bathtub drain?
Plumber’s putty works on many tubs. However, silicone is often recommended for fiberglass and acrylic tubs.
Why does my bathtub drain keep leaking after replacement?
The drain shoe may have damaged threads, loose connections, or improper sealant coverage.
How long does it take to replace a tub drain?
Most bathtub drain replacements take between one and three hours depending on corrosion and accessibility.
✅ Conclusion
Learning how to replace a bathtub drain can help stop leaks, improve drainage, and restore the appearance of your bathtub. Although some drains remove easily, others require additional care due to corrosion or damaged parts. Therefore, using the correct tools and installation methods makes a major difference.
With careful preparation, proper sealing, and thorough leak testing, many homeowners can successfully complete this plumbing repair.
👋🏼 Before You Go…
If you found this guide helpful, save it for future plumbing projects and share it with someone dealing with a leaking or damaged tub drain. Small plumbing problems can become major repairs if ignored, so staying proactive matters.


