If you want to protect your basement from flooding, learning How To Install a Sump Pump is one of the smartest upgrades you can make. A sump pump removes groundwater before it rises high enough to damage flooring, walls, furniture, or stored belongings. Therefore, a properly installed system can help prevent mold growth, structural damage, and costly repairs.
Many homeowners experience basement moisture problems during heavy rain. However, a correctly installed sump pump system helps move water away from the foundation before problems develop. In this guide, you will learn every step of the installation process, including planning, pit preparation, discharge routing, electrical setup, and testing.
🔍 Understanding the Project
A sump pump collects groundwater from a sump basin and pumps it away from your home. Typically, the basin sits in the lowest part of the basement or crawlspace. As water enters the pit, the float switch activates the pump and pushes water outside through a discharge pipe.
Proper installation matters because poor placement or incorrect piping can cause flooding issues later. For example, an improperly routed discharge line may dump water back near the foundation. As a result, the pump may continuously cycle or fail to control groundwater.
Before starting the project, you must plan for:
- Pump size and capacity
- Basin location
- Drainage routing
- Electrical access
- Pipe sizing
- Local plumbing codes
Many installation challenges involve concrete cutting, discharge routing, and float switch clearance. Therefore, careful planning makes the project much smoother.
🧰 Tools & Materials
- Sump pump
- Sump basin
- Check valve
- PVC pipe
- PVC primer
- PVC cement
- PVC elbows and couplings
- Gravel
- Concrete mix
- Tape measure
- Marker
- Utility knife
- Channel-lock pliers
- Screwdrivers
- Hammer drill
- Concrete saw or rotary hammer
- Shop vacuum
- Bucket
- Safety glasses
- Gloves
- GFCI outlet
- Silicone sealant
- Pipe straps
- Drill and bits
🛠️ Step-By-Step Guide: How To Install a Sump Pump
1️⃣ Choose the Installation Location
Select the lowest area of the basement where water naturally collects. Usually, this location sits near foundation walls or perimeter drains.
Additionally, ensure the location provides enough room for the basin, discharge pipe, and future maintenance access. Avoid areas directly beside structural footings whenever possible.
You should also verify that a nearby GFCI outlet is available. If not, contact an electrician before proceeding.
2️⃣ Mark the Sump Basin Outline
Place the sump basin upside down on the floor. Then, trace around the edge using a marker.
Next, add several extra inches around the outline. This additional space allows room for gravel surrounding the basin.
Double-check measurements before cutting the concrete because adjustments become difficult later.
3️⃣ Cut the Basement Floor
Use a concrete saw or rotary hammer to cut along the marked outline. Work slowly and carefully to maintain control.
Concrete dust spreads quickly. Therefore, wear eye protection and a dust mask throughout this step.
After cutting the perimeter, break apart the interior concrete using a hammer or demolition tool. Remove all broken pieces from the work area.
4️⃣ Dig the Sump Pit
Dig the hole deep enough for the sump basin and gravel base. Usually, the pit should allow the basin rim to sit flush with the floor.
Remove loose dirt, rocks, and debris as you dig. Additionally, check for buried pipes or utilities before digging deeper.
Once the hole reaches the correct depth, compact the bottom surface slightly.
5️⃣ Add Gravel to the Bottom
Pour several inches of gravel into the bottom of the hole. Then, level the gravel evenly.
The gravel improves drainage and helps stabilize the basin. In addition, it allows groundwater to flow toward the pit more efficiently.
Check the basin height before continuing.
6️⃣ Install the Sump Basin
Lower the basin into the pit carefully. Make sure it sits level on the gravel base.
Next, fill around the outside of the basin with additional gravel. Continue adding gravel until the area reaches just below floor level.
Afterward, pour concrete around the basin edge to secure it permanently. Smooth the concrete evenly for a clean finish.
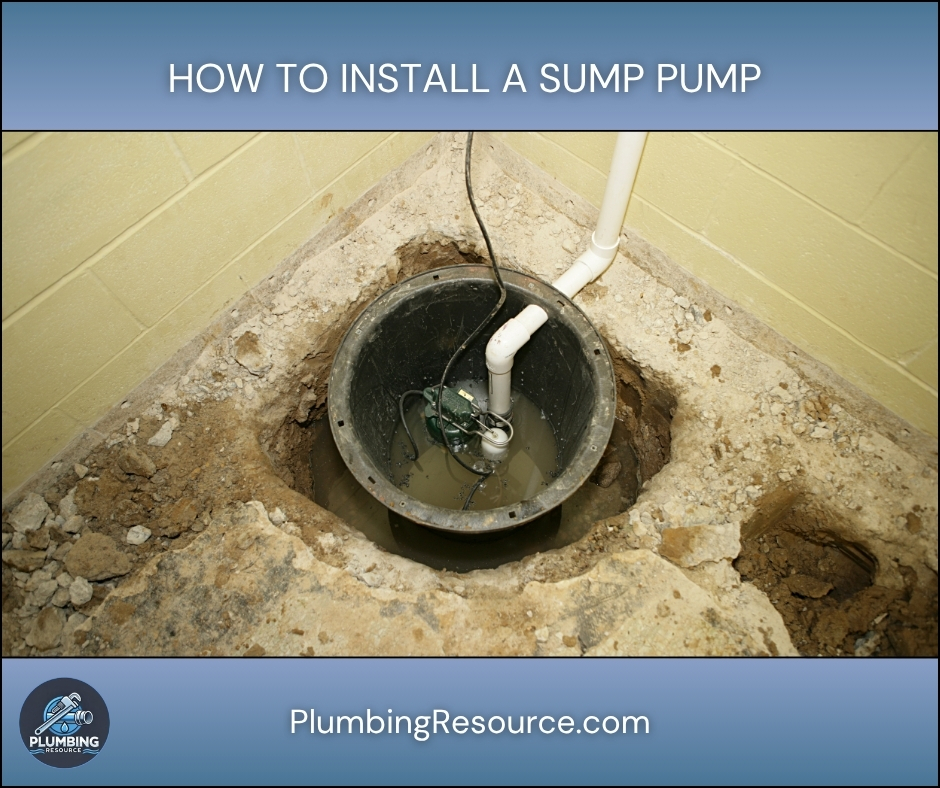
7️⃣ Install the Sump Pump Inside the Basin
Place the sump pump into the basin carefully. Ensure the float switch moves freely without touching basin walls.
If the float becomes restricted, the pump may fail to turn on or off correctly. Therefore, always test float movement before connecting piping.
Many installers place the pump on a small paver or brick to reduce sediment intake.
8️⃣ Connect the Discharge Pipe
Attach PVC piping to the pump discharge outlet according to manufacturer specifications.
Next, run the pipe vertically upward from the basin. Keep the piping straight whenever possible because excessive bends reduce efficiency.
Dry-fit the pipe first before gluing connections permanently.
9️⃣ Install the Check Valve
Install the check valve on the vertical discharge pipe above the pump.
The arrow on the valve must point upward in the direction of water flow. Otherwise, water will drain backward into the pit after the pump shuts off.
The check valve reduces unnecessary pump cycling and extends pump life.
1️⃣0️⃣ Route the Discharge Line Outside
Run the discharge piping through the basement wall or rim joist. Then, extend the piping away from the foundation outside.
Ideally, discharge water at least 10 feet from the house. Otherwise, water may return toward the basement foundation.
Seal all wall penetrations using silicone or polyurethane sealant to prevent water intrusion and air leaks.
1️⃣1️⃣ Connect the Electrical Supply
Plug the sump pump into a dedicated GFCI outlet.
Never use an extension cord for permanent sump pump operation because it creates a safety hazard. In addition, avoid sharing the outlet with heavy appliances.
If wiring modifications are necessary, contact a licensed electrician.
1️⃣2️⃣ Test the Sump Pump System
Fill the basin with water using a bucket or garden hose. Then, watch the float activate the pump.
Observe the entire operation carefully:
- Verify the pump turns on properly
- Confirm water exits outside
- Check for leaks at fittings
- Ensure the check valve functions correctly
- Confirm the pump shuts off at the proper level
Repeat the test several times to verify reliable operation.
⚠️ Common Mistakes
- Installing the basin in the wrong location
- Using undersized discharge piping
- Forgetting the check valve
- Discharging water too close to the foundation
- Restricting float switch movement
- Using an extension cord
- Failing to test the system after installation
- Installing the pump on loose debris instead of a stable surface
💡 Pro Tips
- Install a battery backup system for power outages
- Use a basin lid to reduce moisture and odors
- Label the sump pump breaker clearly
- Test the system before storm season
- Add a high-water alarm for extra protection
- Use rigid PVC instead of flexible tubing whenever possible
🔧 Troubleshooting
Pump Runs But Does Not Remove Water
Check for clogged piping, blocked impellers, or a stuck check valve.
Pump Cycles Repeatedly
The check valve may be installed incorrectly. Additionally, groundwater may be returning too close to the foundation.
Pump Does Not Turn On
Verify power supply, breaker position, and float switch movement.
Excessive Noise During Operation
Check for loose piping, vibrating discharge lines, or failing bearings inside the pump.
Basin Overflows
The pump may be undersized, clogged, or unable to keep up with groundwater volume.
👨🏻🔧 When to Call a Professional
Call a professional if:
- You are uncomfortable cutting concrete
- Electrical upgrades are required
- The basement floods heavily
- Foundation drainage problems exist
- The discharge line requires complex routing
- Structural concerns appear during excavation
A licensed plumber or waterproofing contractor can also help size the system for severe groundwater conditions.
❓ FAQ
How long does it take to install a sump pump?
Most sump pump installations take several hours to a full day. However, new pit excavation may take longer.
Can you install a sump pump without a basement?
Yes. Many crawlspaces use sump pumps to control groundwater and moisture buildup.
How much gravel should go around a sump basin?
Typically, several inches of gravel surround the basin to improve drainage and stability.
What size sump pump do I need?
Most homes use 1/3 HP or 1/2 HP pumps. However, high groundwater areas may require larger systems.
How often should you test a sump pump?
You should test the system at least every few months and before major storms.
✅ Conclusion
Learning How To Install a Sump Pump helps protect your home from water damage, mold, and basement flooding. Although the project requires planning and physical work, a properly installed system can provide years of reliable protection.
Careful basin placement, proper discharge routing, and thorough testing all play major roles in long-term performance. Therefore, take your time during installation and verify every connection carefully.
👋🏼 Before You Go…
If you found this guide helpful, save it for future reference and share it with someone planning a basement project. A reliable sump pump system can prevent major water damage before it starts.


