If your water heater makes popping noises, produces rusty water, or runs out of hot water too fast, sediment buildup may be the problem. Learning How To Flush a Water Heater helps improve efficiency, extend equipment life, and restore heating performance. In addition, regular maintenance helps reduce wear on heating elements and burners.
Many homeowners ignore water heater maintenance until problems appear. However, sediment accumulation can slowly damage the tank over time. Therefore, flushing the tank regularly is one of the best preventative plumbing maintenance tasks you can perform.
🔍 Understanding the Project
Water heater flushing is a maintenance procedure that removes sediment, minerals, and debris from inside the tank. Over time, hard water minerals settle at the bottom of the heater. As a result, the system becomes less efficient and may begin making loud rumbling or popping sounds.
Sediment buildup creates an insulating layer between the burner or heating elements and the water. Consequently, the heater works harder and uses more energy. In severe cases, overheating can damage internal components or shorten the life of the tank.
Regular flushing helps:
- Improve heating efficiency
- Extend tank lifespan
- Reduce noise
- Improve hot water recovery
- Prevent overheating damage
Most manufacturers recommend flushing a water heater once per year. However, homes with hard water may require more frequent maintenance.
🧰 Tools & Materials
- Garden hose
- Bucket
- Flathead screwdriver
- Adjustable wrench
- Towels or rags
- Gloves
- Safety glasses
- Flashlight
- Shop vacuum (optional)
- Replacement drain valve (optional)
🛠️ Step-By-Step Guide: How To Flush a Water Heater
1️⃣ Turn Off the Water Heater
First, shut off the power or fuel supply to the heater.
For electric water heaters:
- Turn off the breaker inside the electrical panel.
For gas water heaters:
- Turn the gas control valve to the “Pilot” setting.
This step is critical because heating elements or burners can become damaged if the tank empties while power remains on.
2️⃣ Shut Off the Cold Water Supply
Next, locate the cold water shutoff valve above the heater.
Turn the valve clockwise until it stops. This prevents new water from entering the tank during draining.
If the valve does not fully close, the tank may continue filling while you work. Therefore, verify the water supply is completely off.
3️⃣ Open a Hot Water Faucet
Open the hot side of a nearby sink faucet.
This step relieves pressure inside the plumbing system. In addition, it allows air into the lines so the tank drains faster.
Leave the faucet open during the flushing process.
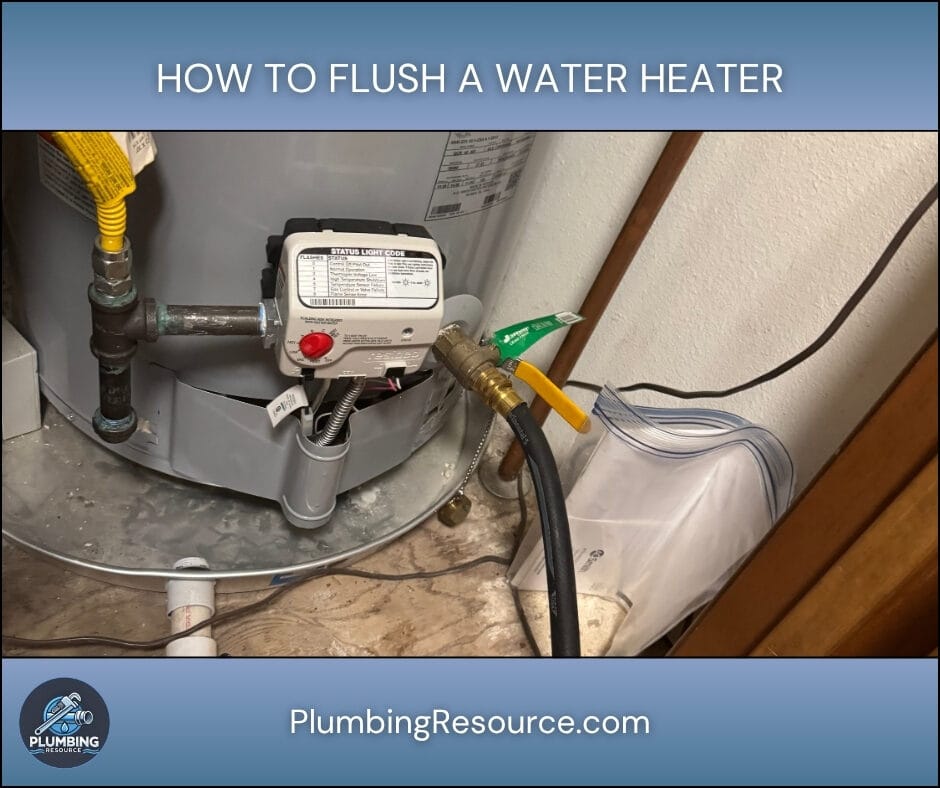
4️⃣ Connect a Garden Hose to the Drain Valve
Locate the drain valve near the bottom of the water heater.
Attach a garden hose securely to the valve. Then, route the other end to:
- A floor drain
- A driveway
- An exterior location
- A utility sink
Make sure the hose remains lower than the tank. Otherwise, gravity drainage may slow down.
5️⃣ Open the Drain Valve
Carefully open the drain valve using:
- A flathead screwdriver, or
- The built-in valve handle
Hot water will begin flowing through the hose immediately.
Be cautious because the water may still be extremely hot.
Allow the tank to drain completely.
6️⃣ Flush the Tank with Fresh Water
Once most of the water drains out, turn the cold water supply back on briefly.
This helps stir up sediment remaining at the bottom of the tank. Consequently, debris will flush out through the hose.
Continue flushing until the water runs clear.
In heavily scaled tanks, you may need to repeat this process several times.
7️⃣ Remove Stubborn Sediment
Sometimes sediment blocks the drain valve opening.
If this happens:
- Briefly open and close the cold water valve
- Wiggle the drain valve gently
- Disconnect the hose carefully to inspect the blockage
In severe cases, a shop vacuum may help remove debris.
Older tanks may contain large mineral chunks. Therefore, patience is important during this step.
8️⃣ Close the Drain Valve
After the water runs clean, close the drain valve completely.
Do not overtighten the valve because plastic drain valves can crack.
Next, disconnect the hose carefully.
Inspect the valve for leaks afterward.
9️⃣ Refill the Water Heater
Turn the cold water supply back on fully.
Keep the nearby hot faucet open while the tank fills. This allows trapped air to escape from the plumbing system.
Once water flows steadily from the faucet, close it.
The tank should now be completely full.
🔟 Restore Power or Gas
For electric water heaters:
- Turn the breaker back on only after the tank is full
For gas water heaters:
- Turn the gas valve back to the “On” position
Never energize an empty electric tank because dry-fired heating elements can fail instantly.
1️⃣1️⃣ Check for Leaks and Test Operation
Finally, inspect:
- The drain valve
- Water connections
- Relief valve
- Supply piping
Look for drips or moisture.
Then, allow the heater to recover and test hot water at a faucet.
The system should operate quieter and heat more efficiently after flushing.
⚠️ Common Mistakes
- Forgetting to turn off power before draining
- Restoring power before the tank refills
- Using a damaged garden hose
- Draining extremely hot water without caution
- Overtightening the drain valve
- Skipping annual maintenance
- Ignoring signs of severe sediment buildup
💡 Pro Tips
- Flush the heater annually for best performance.
- Install a sediment filter if your home has hard water.
- Use a full-port brass drain valve for better flow.
- Flush more frequently in areas with mineral-heavy water.
- Listen for popping sounds because they often indicate sediment accumulation.
🔧 Troubleshooting
Water Will Not Drain
The drain valve may be clogged with sediment. Try briefly turning the cold water supply on to break up debris.
Drain Valve Leaks
Sediment may be trapped inside the valve. Open and close it several times to help clear the seal.
Water Looks Rusty
Rust-colored water may indicate tank corrosion or heavy sediment buildup.
Water Heater Still Makes Noise
Additional flushing may be required if thick sediment remains inside the tank.
👨🏻🔧 When to Call a Professional
Contact a licensed plumber if:
- The drain valve breaks
- The tank leaks
- Sediment completely blocks draining
- The heater will not restart
- Rusty water continues after flushing
- The unit is very old or heavily corroded
Professional service may also be necessary if the water heater has never been flushed before.
❓ FAQ
How often should you flush a water heater?
Most water heaters should be flushed once per year. However, hard water systems may require flushing every six months.
Can sediment damage a water heater?
Yes. Sediment can overheat the tank bottom, reduce efficiency, and shorten the lifespan of the heater.
How long does it take to flush a water heater?
Most water heater flushes take between 30 minutes and 1 hour depending on sediment buildup.
Should you flush an old water heater?
Sometimes older tanks may begin leaking after flushing because sediment was masking weak spots. Therefore, inspect older heaters carefully beforehand.
Why is my water heater making popping noises?
Popping noises usually occur when trapped water boils beneath layers of sediment inside the tank.
✅ Conclusion
Learning How To Flush a Water Heater is an important part of home plumbing maintenance. Regular flushing removes sediment, improves efficiency, and helps extend the life of the unit. In addition, routine maintenance can help prevent expensive repairs and inconsistent hot water problems.
By following these step-by-step instructions, you can safely maintain your water heater and keep it operating efficiently year-round.
👋🏼 Before You Go…
If this guide helped you, save it for future maintenance and share it with someone dealing with water heater problems. Regular plumbing maintenance can prevent major repairs later.


