If your water suddenly turns cold, becomes extremely hot, or runs out too fast, you may need to learn How To Replace a Water Heater Thermostat. The thermostat controls when the heating elements turn on and off. Therefore, a failed thermostat can completely disrupt your hot water supply. Fortunately, replacing a thermostat on an electric water heater is a manageable project when you follow the correct steps.
🔍 Understanding the Project
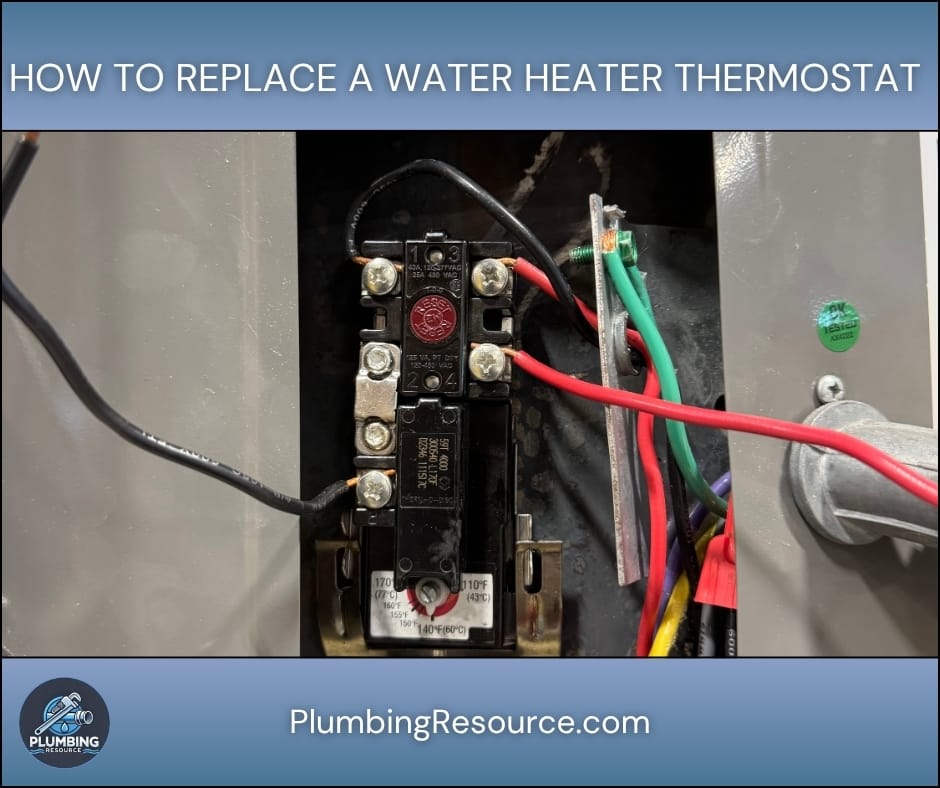
A water heater thermostat regulates the tank temperature by controlling the heating elements. Over time, however, thermostats can wear out because of electrical cycling, age, sediment buildup, or overheating conditions.
Several warning signs often indicate thermostat failure:
- Water is not getting hot enough
- Water becomes dangerously hot
- Hot water runs out very quickly
- The reset button keeps tripping
- The water heater produces inconsistent temperatures
In many cases, replacing the thermostat restores normal operation without replacing the entire water heater. Additionally, newer thermostats may improve efficiency and temperature consistency.
Before starting, you must verify compatibility. Electric water heaters commonly use upper and lower thermostats, and the replacement part must match your heater’s voltage and configuration.
🧰 Tools & Materials
- Replacement water heater thermostat
- Phillips screwdriver
- Flathead screwdriver
- Non-contact voltage tester
- Multimeter
- Needle-nose pliers
- Work gloves
- Flashlight
- Phone camera for wiring reference
- Electrical tape
🛠️ Step-By-Step Guide: How To Replace a Water Heater Thermostat
1️⃣ Turn Off the Power
Locate the breaker labeled for the water heater inside the electrical panel. Then, switch the breaker completely off.
Electric water heaters typically operate on 240 volts. Therefore, failing to disconnect power can result in serious injury or death.
After shutting off the breaker, use a non-contact voltage tester at the heater to confirm no power remains.
2️⃣ Remove the Access Panels
Use a screwdriver to remove the upper and lower metal access covers on the side of the tank.
Most electric water heaters have:
- An upper thermostat
- A lower thermostat
- Two heating elements
After removing the panels, carefully fold back the insulation. Next, remove the plastic safety covers protecting the wiring.
3️⃣ Identify the Failed Thermostat
The upper thermostat usually controls overall heater operation. Meanwhile, the lower thermostat mainly controls the lower heating element.
Common symptoms include:
- No hot water at all = upper thermostat issue
- Limited hot water = lower thermostat issue
- Water too hot = thermostat stuck closed
If you own a multimeter, you can test continuity and voltage to verify failure before replacing the thermostat.
4️⃣ Take a Photo of the Wiring
Before disconnecting anything, take several clear photos of the thermostat wiring.
This step is extremely important because thermostat terminals can vary between manufacturers. In addition, wire placement mistakes can damage the heater or create dangerous electrical issues.
5️⃣ Disconnect the Wires
Use a screwdriver to loosen the terminal screws on the thermostat.
Then, carefully pull each wire free. Keep the wires separated so they do not touch each other or nearby metal surfaces.
If needed, label the wires using electrical tape for easier reinstallation.
6️⃣ Remove the Old Thermostat
Most water heater thermostats slide behind retaining clips attached to the tank.
Gently pull the thermostat outward from the clips. Then, remove it completely.
Be careful not to bend the retaining clips too far because they must hold the new thermostat tightly against the tank surface.
7️⃣ Install the New Thermostat
Slide the replacement thermostat into the retaining clips.
The thermostat must sit completely flush against the tank. Otherwise, it cannot accurately sense water temperature.
Next, reconnect all wires exactly as they were originally installed.
Tighten terminal screws securely. However, avoid overtightening because damaged terminals can create loose electrical connections later.
8️⃣ Set the Temperature
Most manufacturers recommend a setting around 120°F.
This temperature helps reduce:
- Scalding risks
- Energy consumption
- Mineral buildup inside the tank
Use a flathead screwdriver to adjust the thermostat dial if necessary.
If you replace both thermostats, set them to the same temperature.
9️⃣ Reinstall the Covers and Insulation
Carefully reposition the insulation over the thermostats and wiring.
The insulation helps the thermostat read temperature correctly. Therefore, never leave it out.
Next, reinstall the plastic safety covers and metal access panels.
1️⃣0️⃣ Restore Power
Return to the electrical panel and turn the breaker back on.
The heater may take 30 to 90 minutes to fully reheat the tank depending on:
- Tank size
- Thermostat settings
- Element wattage
Avoid running large amounts of hot water during the recovery period.
1️⃣1️⃣ Test the Water Temperature
Turn on a nearby hot water faucet after the heater has had time to recover.
Check for:
- Consistent hot water
- Proper temperature
- No overheating
- Normal recovery times
If the water temperature remains unstable, additional troubleshooting may be necessary.
⚠️ Common Mistakes
- Forgetting to shut off power
- Installing the wrong thermostat type
- Crossing wires during installation
- Leaving insulation out
- Setting the thermostat too high
- Failing to test for voltage before touching wires
- Using loose terminal connections
💡 Pro Tips
- Replace both thermostats if the heater is older
- Take multiple wiring photos before removal
- Check heating elements while the heater is open
- Flush sediment from the tank annually
- Use manufacturer-approved replacement parts
- Test the high-limit reset button during inspection
🔧 Troubleshooting
Water Still Is Not Hot
The heating element may also be failed. Therefore, test the elements with a multimeter.
Reset Button Keeps Tripping
This issue may indicate:
- A grounded heating element
- A defective thermostat
- Loose wiring
- Overheating conditions
Water Gets Too Hot
Lower the thermostat setting immediately. If the issue continues, replace the thermostat again because it may be defective.
Breaker Trips Repeatedly
A short circuit or failed element may exist. In this situation, stop using the heater until repairs are completed.
👨🏻🔧 When to Call a Professional
Contact a licensed plumber or electrician if:
- You smell burning wires
- The breaker will not stay on
- Wiring appears damaged
- The heater leaks water
- You are uncomfortable working with electricity
- The water heater is a gas model
- The thermostat replacement does not solve the issue
Gas water heater thermostats are integrated into gas control valves. Therefore, gas models require specialized repair procedures.
❓ FAQ
How do I know if my water heater thermostat is bad?
Common signs include inconsistent hot water, no hot water, overheating water, or short hot water duration.
Can I replace a water heater thermostat myself?
Yes, many homeowners can replace an electric water heater thermostat if they follow proper safety procedures.
How long does it take to replace a water heater thermostat?
Most thermostat replacements take between 30 and 60 minutes.
Should I replace both thermostats at the same time?
If the water heater is older, replacing both thermostats can help prevent future issues.
What temperature should I set my water heater thermostat to?
Most professionals recommend 120°F for safety and efficiency.
✅ Conclusion
Learning How To Replace a Water Heater Thermostat can restore reliable hot water and extend the life of your electric water heater. By following each step carefully, you can safely remove the old thermostat, install the replacement, and restore consistent performance.
Always prioritize safety during the process. Additionally, never hesitate to contact a professional if electrical issues become unclear or hazardous.
👋🏼 Before You Go…
If this guide helped you, save it for future reference and share it with someone dealing with hot water problems. You never know when a simple thermostat replacement can prevent a much larger repair bill.


